|
Narrative
On the 3rd of August 1914 the Australian government
offered to send an expeditionary force of 20,000 men to Europe, which it
decided to organise as an infantry division and a light horse brigade.
Accordingly, the First Division was formed in Australia in August 1914.
Intended to be representative of the nation as a whole, it was organised
from contingents from all states.
|
It was originally intended to send the
division to England for training and thence on to the Western Front but
the division was diverted to Egypt instead on the recommendation of
Colonel Harry Chauvel, owing to the state of training areas in the United
Kingdom. The division arrived in Egypt in December and began training at
Mena, near Cairo, and in sight of the great pyramids. |
On Anzac Day, 25 April 1915, the First Division made an
amphibious assault at what is now known as Anzac Cove, on the Gallipoli
Peninsula. On Anzac Day the division was unable to capture its objectives
but secured a toehold on the peninsula. It served throughout the campaign
there. In May the 2nd Brigade was re-embarked and participated in the
attack on Krithia at Helles but returned in time for the Turkish counter
offensive on 19 May. On 15 May, its commander, Major General William
Bridges was fatally wounded by a sniper. During the August offensive, the
First Division captured the Turkish positions around Line Pine. Finally,
it was involved in the withdrawal to Egypt in December 1915.
In March 1916 it moved to France, taking over part of
the line in the "nursery sector" around Armentieres. On 23 July
1916, it joined the Somme Offensive, capturing the town of Pozieres at
great cost. A second tour of Pozieres followed in August and a third at
Flers in October after a rest break in the Ypres sector.
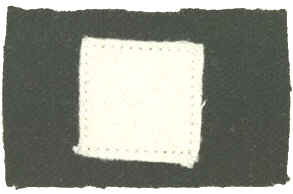 |
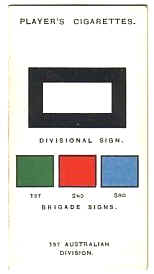
Horizontally aligned
rectangular colour patch for Headquarters 1 Australian Division,
AIF,
showing a central white square on a black background. Worn as a
distinguishing unit indication at the head of each sleeve from 1917.
This patch superseded an earlier colour patch used by the headquarters
from 1916-1917, which consisted of a square colour patch showing a white
central square on a black background. |
In 1917 it was involved in the pursuit of the Germans to
the Hindenburg Line. While maintaining outposts close to that line around
Lagnicourt, the division was struck by a powerful German
counterattack on 15 April 1917 and beat it off. In May it relieved the
Second Division in the Second Battle of Bullecourt.
After a rest spell, the division returned to the Ypres
Salient and participated in the Third Battle of Ypres, in which it fought
with great success at Menin Road in September and Broodeseinde in October.
In April 1918 the First Division halted the German
offensive at Hazebrouck. It remained there, apart from the other divisions
for four months, engaging in a spirited and active campaign against the
enemy. It rejoined the Australian Corps in the Somme region in 1918 in
time to participate in the Battle of Amiens and fought on to the
Hindenburg Line.
Commanders
- Major
General William T. Bridges 6 August 1914 to 15 May 1915 (mortally
wounded)
- Brigadier General H. B. Walker 15 May 1915
to 24 June 1915
- Major
General J. Gordon Legge 24 June 1915 to 26 July 1915
- Brigadier General H. B. Walker 26 July 1915
to 13 October 1915 (wounded)
- Brigadier
General J. J. Talbot Hobbs 13 October 1915 to 6 November 1915
- Brigadier
General/Major General Harry Chauvel 6 November 1915 to 14 March
1916
- Major General H. B. Walker 14 March 1916 to
31 May 1918
- Major
General T. William Glasgow 31 May 1918 to past November 1918
Campaigns
Egypt: Defence of Suez Canal, Gallipoli:
Landing at Anzac, Defence of Anzac, Sari Bair, Western Front: Pozieres,
Advance to the Hindenburg Line, Bullecourt, Menin Road, Broodeseinde,
Hazebrouck, Amiens, Hindenburg Line
Casualties
- killed in action: 10,447
- died of wounds: 3,553
- other deaths: 1,133
- prisoners: 500
- wounded: 35,984
- total: 51,647
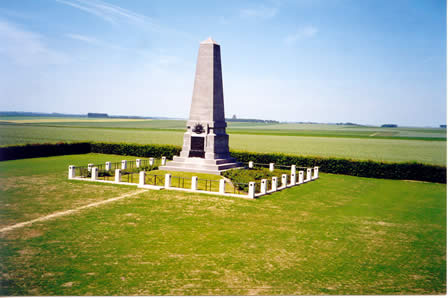
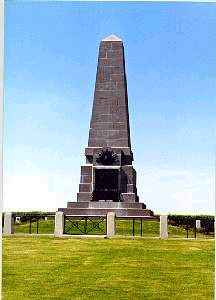
Memorial at Pozieres |
 |
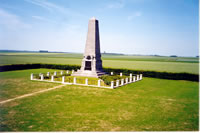 |
Located at Pozieres, it is easily seen from the D929
Albert-Bapaume road. During the battle for Pozieres in July
1916, the 1st Division were under continuous heavy artillery
fire.
When the Division withdrew on 27 July 1916 they had lost
5,285 officers and men in four days. The 2nd Division relieved
the survivors of the 1st Division. |
First Division (Egypt and Gallipoli,
1914-15)
First
Division (France, April 1916)
-
1st Division Artillery
-
1st Field Artillery Brigade [16 x 18 pounders]
-
1st,2nd,3rd,22nd Field Artillery Batteries
-
1st Brigade Ammunition Column
-
2nd Field Artillery Brigade [16 x 18 pounders]
-
4th,5th,6th,23rd Field Artillery Batteries
-
2nd Brigade Ammunition Column
-
3rd Field Artillery Brigade [16 x 18 pounders]
-
7th,8th,9th,24th Field Artillery Batteries
-
3rd Brigade Ammunition Column
-
21st Field Artillery (Howitzer) Brigade [12 x 4.5
inch howitzers]
-
101st,102nd,103rd Field Artillery (Howitzer)
Batteries
-
21st Brigade Ammunition Column
-
1st Division Ammunition Column
-
1st Division Trench Mortars
-
V1A Heavy Trench Mortar Battery [4 x 9.45
inch heavy trench mortars]
-
X1A,Y1A, Z1A Medium Trench Mortar Batteries
[12 x 2 inch medium trench mortars]
-
1st Division Engineers
-
1st Infantry Brigade
-
1st,2nd,3rd,4th Infantry Battalions (New South
Wales)
-
1st Machinegun Company [16 x Vickers Machineguns]
-
1A/1, 1A/2 Light Trench Mortar Batteries [8 x 3.7
and 4 inch trench mortars]
-
2nd Infantry Brigade
-
5th,6th,7th,8th Infantry Battalions (Victoria)
-
2nd Machinegun Company [16 x Vickers Machineguns]
-
2A/1, 2A/2 Light Trench Mortar Batteries [8 x 3.7
and 4 inch trench mortars]
-
3rd Infantry Brigade
-
9th,10th,11th,12th Infantry Battalions
(Queensland; South Australia; Western Australia; Tasmania, South
Australia and Western Australia)
-
3rd Machinegun Company [16 x Vickers Machineguns]
-
3A/1, 3A/2 Light Trench Mortar Batteries [8 x 3.7
and 4 inch trench mortars]
-
1st Pioneer Battalion
-
1st Division Medical Services
-
B Squadron, 4th Light Horse Regiment (Victoria)
-
1st Cyclist Company
-
1st Salvage Section
-
1st Divisional Train
-
1st Division Supply Column
-
1st Division Ammunition Sub Park
-
1st Mobile Veterinary Section
First Division (France, July 1916)
-
1st Field Artillery Brigade [12 x 18 pounders, 4 x
4.5 inch howitzers]
-
1st,2nd,3rd Field Artillery Batteries
-
101st Field Artillery (Howitzer) Battery
-
2nd Field Artillery Brigade [12 x 18 pounders, 4 x
4.5 inch howitzers]
-
4th,5th,6th Field Artillery Batteries
-
102nd Field Artillery (Howitzer) Battery
-
3rd Field Artillery Brigade [12 x 18 pounders, 4 x
4.5 inch howitzers]
-
7th,8th,9th Field Artillery Batteries
-
103rd Field Artillery (Howitzer) Battery
-
21st Field Artillery Brigade [12 x 4.5 inch
howitzers]
-
1st Division Ammunition Column
-
1st Division Trench Mortars
-
V1A Heavy Trench Mortar Battery [4 x 9.45 inch
heavy trench mortars]
-
X1A,Y1A,Z1A Medium Trench Mortar Batteries [12 x
2 inch medium trench mortars]
-
1st Division Engineers
-
1st,2nd,3rd,4th Infantry Battalions (New South Wales)
-
1st Machinegun Company [16 x Vickers Machineguns]
-
1st Light Trench Mortar Battery [8 x 3 inch Stokes
Mortars]
-
2nd Infantry Brigade
-
5th,6th,7th,8th Infantry Battalions (Victoria)
-
2nd Machinegun Company [16 x Vickers Machineguns]
-
2nd Light Trench Mortar Battery [8 x 3 inch Stokes
Mortars]
-
3rd Infantry Brigade
-
9th,10th,11th,12th Infantry Battalions (Queensland;
South Australia; Western Australia; Tasmania, South Australia and
Western Australia)
-
3rd Machinegun Company [16 x Vickers Machineguns]
-
3rd Light Trench Mortar Battery [8 x 3 inch Stokes
Mortars]
-
1st Pioneer Battalion
-
1st Division Medical Services
-
1st,2nd,3rd,4th Australian Army Service Corps
Companies
-
1st Mobile Veterinary Section
First Division (France, September 1918)
-
1st Field Artillery Brigade [18 x 18 pounders, 6 x
4.5 inch howitzers]
-
1st,2nd,3rd Field Artillery Batteries
-
101st Field Artillery (Howitzer) Battery
-
2nd Field Artillery Brigade [18 x 18 pounders, 6 x
4.5 inch howitzers]
-
4th,5th,6th Field Artillery Batteries
-
102nd Field Artillery (Howitzer) Battery
-
1st Division Ammunition Column
-
1st Division Trench Mortars
-
1st Division Engineers
-
1st Infantry Brigade
-
1st,2nd,3rd,4th Infantry Battalions (New South
Wales)
-
1st Light Trench Mortar Battery [8 x 3 inch
Stokes mortars]
-
2nd Infantry Brigade
-
5th, 6th,7th,8th Infantry Battalions (Victoria)
-
2nd Light Trench Mortar Battery [8 x 3 inch
Stokes mortars]
-
3rd Infantry Brigade
-
9th,10th,11th,12th Infantry Battalions
(Queensland; South Australia; Western Australia; Tasmania, South
Australia and Western Australia)
-
3rd Light Trench Mortar Battery [8 x 3 inch
Stokes mortars]
-
1st Machinegun Battalion [64 x Vickers Machineguns]
-
1st Pioneer Battalion
-
1st Division Medical Services
-
1st Salvage Section
-
1st Division Train
-
1st Mobile Veterinary Section
This copy supplied in part by Ross Mallett (ADFA) and in part
by AWM and other sources.
|