 |
| Category: Equipment |

|
|
|
|
|
|
THE PATTERN 1908 WEB INFANTRY
EQUIPMENT. |
|
Fully illustrated (see below) |
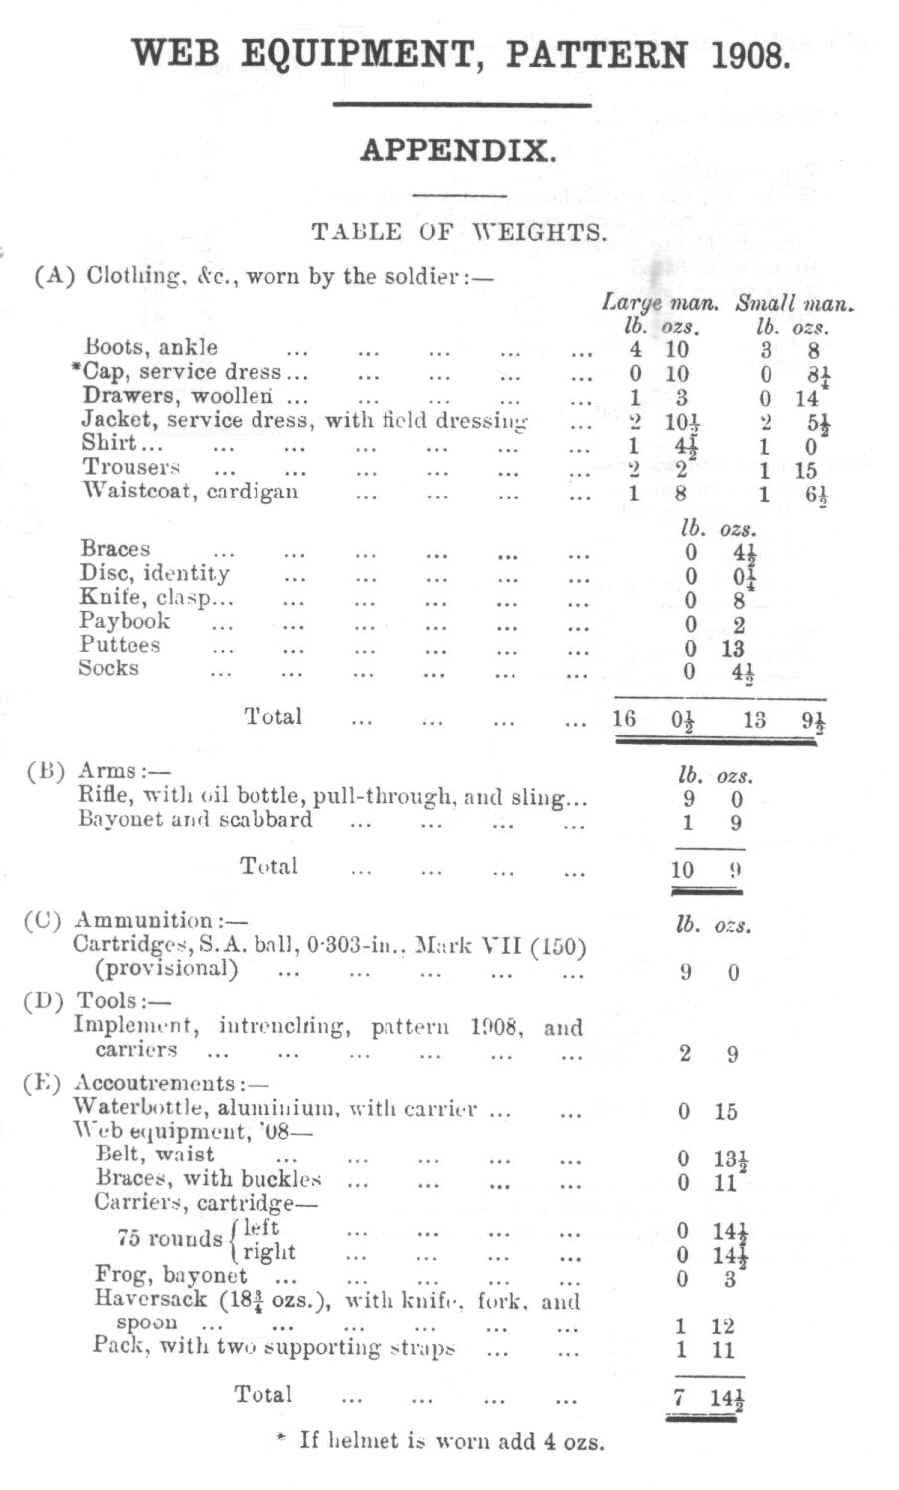
(1) The main principle underlying the design of the Pattern 1908 Web Equipment is that the complete set which is called the
"Marching Order" equipment can be divided into two parts.
- (2) The first portion consists of such portion of the equipment as is necessary to enable the following items to be carried, viz.:
- Rifle (with sling).
- Bayonet.
- Ammunition.
- Entrenching tool.
- Water bottle.
- Haversack.
To these may be added one iron ration, knife, spoon and fork, and such food as can be carried in the haversack.
When a second iron ration is to be carried, it will be distributed about the equipment as most convenient.
The second portion consists of the pack and supporting straps, which can readily be removed from the remainder of the equipment.
(3) If necessary the first portion only can be worn alone. It is known as "
marching order without pack."
The remainder, which consists of the pack and supporting straps, can, together with the contents of the pack, be
discarded when it is considered desirable, and forwarded as opportunity offers.
- The pack contains
- Great coat.
- Comforter cap.
- Spare pair of socks.
- Mess tin and cover.
- Tooth brush.
- Shaving brush.
|
- and
- Hold-all.
- Razor.
- Comb.
- Towel.
- Soap.
- Housewife.
|
This arrangement allows of the soldier having, normally with him the whole of his equipment, while, when specially ordered, the pack can be
discarded *, and, if necessary, extra ammunition in cotton bandoliers carried in its place.
*
Some of the other features of the equipment are alluded to in the following remarks:
(A) The c The result of this is that the whole of it can be taken off in one motion, and unless
it is required to be taken apart for any purpose, remains intact and ready for putting on again at a moment's notice.
The advantages of such an arrangement are obvious. Men can turn out in barracks or camp fully equipped in a few moments, even in the dark. Separate articles have not to be hunted for, by no means an easy matter in a crowded tent ; all that each man has to do is to seize his rifle and equipment and double to the place of assembly, and within a few seconds of his arrival there he its
ready to march off. Again, when a halt occurs on the line of march, every man can at once, if be wishes, divest himself of the whole of his load, resuming it the moment the ord er is given to fall in.
(B) The equipment is perfectly balanced.
All former equipments have suffered from the defect that with no ammunition in the pouches in front, and with a pack or rolled great coat on
the back, the weight of the latter pulls up the belt in front. In the 1908 equipment this does not occur ; for no matter what the contents of the pack may weigh, nor whether the cartridge carriers be full or empty, no movement of the equipment over the shoulders can take place if it has been properly fitted,
There are no straps crossing the chest. This feature, taken in conjunction with that referred to in (B), accounts for the fact, that the soldier can at all times march with his
waist belt undone, and every button of his coat unfastened. During
manoeuvres and in the field no restriction should be placed upon this being done
unless an order to the contrary be specially given. The advantages to be derived
there-from are too obvious to mention, but it should be clearly understood that the
correct balance of the equipment is in no way impaired even under these conditions.
(D) Flexibility of the equipment.
With the exception of the pack, which, when worn, must always be
to the back. the articles carried by the soldier can be disposed in a variety of ways.
By means of the end pieces provided there are altogether four places in which the haversack, water bottle, and
entrenching tool can be carried, and their relative positions can therefore be varied at will. For example, assuming the pack to have been discarded, the haversack and water bottle can be taken away from their normal positions on the hips, fastened together, and placed on the back. In this way the hips are freed from
everything except the bayonet and entrenching tool, whereby the man's actions are less hampered, especially in rough or
difficult country.
|
SECTION II.-DESCRIPTION OF THE EQUIPMENT. |
The equipment is made throughout of specially waterproofed and woven webbing. The -waterproofing process is applied to the yarn before it is dyed, and thereby produces a material more efficient in this respect than others which are treated after being made up. The result of the treatment is to render the material practically impervious to the weather, which might otherwise tend to make it hard or cause it to stretch and shrink.
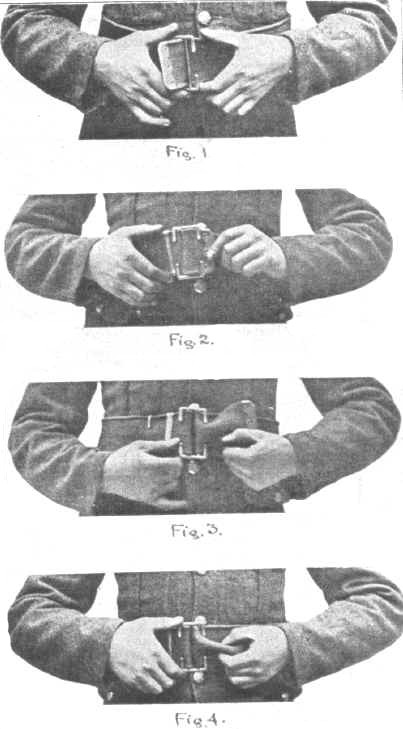
All the buckles used with the equipment are of the tongue-less or self-locking variety. With
this description of buckle the free end of the strap is passed through the slot, over the central bar and under the horns of the other side of the buckle.
(Plate II Figs. 1 and 2. below)
The gap between the horns is known as the "gate".
| The strap will then be found to be securely locked, and though it may be tightened up it will not slip back.
The strap may either be threaded directly through the horns of the buckle, or one edge of it can be passed sideways in through the gate, the other edge being subsequently inserted by pinching up the web.
(Plate II Fig. 3.)
If possible a strap should be passed sufficiently far through a buckle to allow this to be easily done.
If the end be left too short the brass tip at the end of the strap renders this pinching difficult and is itself liable in time to become loose and to drop off.
To unfasten the attachment all that is necessary is to pinch the
edges of the strap together at a point just outside the horns of the buckle, when the web will pass freely out between the horns. (Plate
II, Fig. 4.)
The strap has then only to be pulled out through the slot.
The large buckle on the waist-belt is constructed somewhat differently from the others, being a double one ; the principle involved is, however, just the same.
|
Plate II |
 |
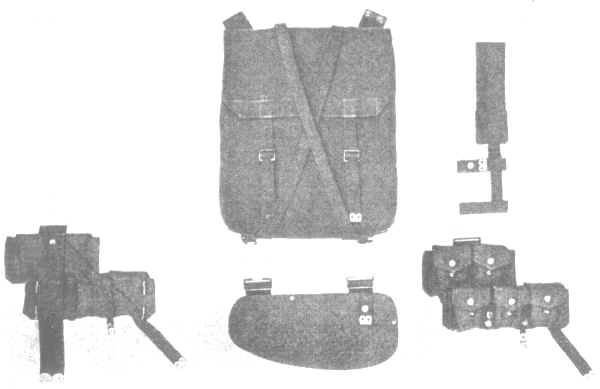
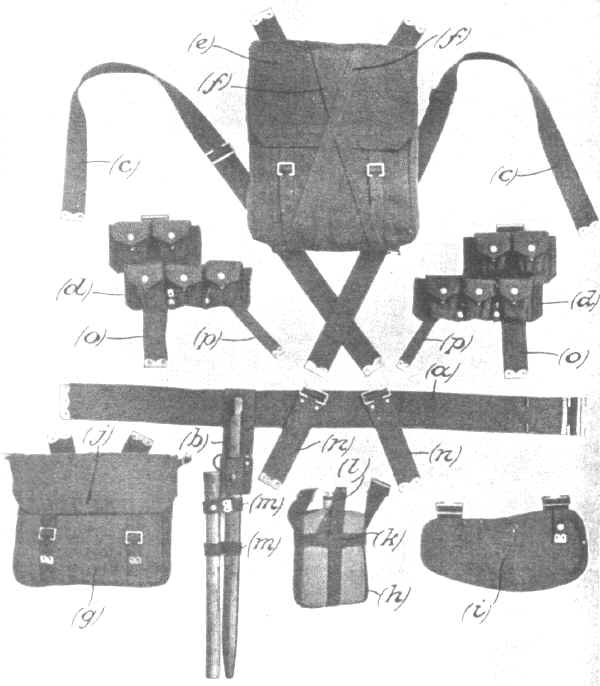
- The component parts of the equipment consist of the following:-
- (a.) Waist-belt.
- (b.) Frog.
- (c.) Braces (2).
- (d.) Cartridge carriers (1 left, 1 right).
- (e.) Pack. Supporting straps (2).
- (f). Haversack.
- (h.) Water bottle carrier.
- (i.) Entrenching tool carriers (head).
- (j.) Loop on haversack.
- (k.) Loop on water bottle carrier.
- (I.) Extending piece (water
bottle carrier).
- (m.) Entrenching tool carrier (helve).
- (n.) End pieces.
- (o.) Extending piece (cartridge carrier).
- (p.) Carrier diagonal strap.
(a.) Waist-belt.- This is issued in three sizes, large, medium and small, the over-all length of the webbing being 48, 44 and
40 inches respectively. The width is 3 inches in each case. It is fitted with a large buckle in front, and with two smaller buckles and two end pieces (n) in the centre of the back. The length of the belt is adjustable about the buckle end.
(b.) Frog.
This consists of a loop to slip on the
waist-belt and a body fitted with two horizontal loops. The scabbard is inserted and pushed through until the stud on the outside comes out between the two loops. Sewn to the back of the frog is a tab of I inch web strapping, 7 inches long, by means of which the carrier for the helve of the
entrenching tool is secured to the frog.
(c.) Braces.
These are interchangeable, and each consists of a strip of webbing 50 inches long and 2 inches wide. Each brace is provided
with a sliding buckle for the attachment of the pack. The pack is secured to, but must not hang from these buckles.
(d.) Cartridge Carriers.
These are not interchangeable, one being reserved for the right and one for the left hand side ; in all other respects they are identical.
Each consists of an assemblage of five 15.round pockets in two tiers with separate covers secured by means of snap fasteners. An upper and a lower stud are provided for each fastener, but the upper one should in general be used to prevent unnecessary wear to the lid. The interior of each pocket is divided by means of partitions into three receptacles, each holding one clip of five rounds.
The carrier is fitted with a double hook at each end for attaching it to the
waist-belt, to which it is further secured by two narrow bands passing round the belt and snapped on to studs on the lower front edge of the carrier. A buckle and tab are fitted to the back, as
also a narrower end piece set obliquely and protruding to the rear of the carrier. This end piece is termed the carrier diagonal strap.
(e.) Pack.
This consists of a rectangular shaped sack. the dimensions of which are approximately 15 X 13 x 4 inches. It is open at the top and is closed
with a folding cover secured by two narrow straps Weather flaps are provided which fold down under the
cover. Two web loops are attached to the bottom of the pack, through which the supporting straps (f) are passed. A short 2 inch tab is fixed to each of the upper corners on the side nearest to the wearer's back, also small buckles to which the upper ends of the supporting straps
are secured.
(f) Supporting Straps- These are interchangeable, and each consists of a strip of 1 inch webbing 32 inches long, fitted with a buckle at one end.
(g) Haversack.-This consists of a rectangular bag of dimensions (approximate) 11 x 9 X 2 inches, and has a cover
secured by two small straps and buckles. The interior is longitudinally divided by means of a partition : converted haversacks, at present largely in use are not so divided. The haversack has fitted on the back two securing tabs, by which it can be attached to the braces and worn on the back, and also two small buckles at the bottom corners ; at the sides two large buckles for attaching it in its normal position on the left hip. In the original supplies the two smaller buckles were placed at the lower corners of the front.
Another small buckle is fitted to the top of the cover and in the earlier supplies a stud was provided lower down on the haversack itself. This stud is now replaced by a loop in the centre of the edge of the flap. These attachments allow of the water-bottle being carried on the haversack under certain conditions.
(h.) Water bottle Carrier.-
This consists of a skeleton framework in which the water bottle is inserted and secured by a snapped on retaining strap. The carrier is fitted with two buckles for attachment to the end pieces of the equipment, and, in the earlier supplies, has a short extension piece and snap fastener for use when -the
water bottle is carried on the front of the haversack (when the haversack is carried on the back in place of the pack, see Sect. III, 17). In later supplies the extension piece passes through a loop in the top band of the carrier instead of being sewn thereto,
This is required in combination with the loop on the flap of the haversack of later supplies.
The modified water bottle carrier and the modified haversack must be used together (List of Changes § 15950).
(i) Entrenching Tool
Carrier.-
The entrenching too] carriers are
worn one on each side, that on the left (m) holding the helve, while that on the right side (i) carries the head of the tool.
The helve carrier consists of a web framework composed of two double loops of one inch webbing, one above the other and about 4 inches apart. They are joined by a short connecting strap, fitted at one end with a buckle to which the tab on the under side of the sword bayonet
scabbard frog is attached.
Of the upper pair of loops the one which passes round the helve can be opened and closed by means of the usual snap fastening. The helve is worn to the front of the scabbard.
The carrier for the head of the tool consists of a web bag with a stout cotton lining of the same colour as the rest of the equipment. The pan of the tool is worn to the front, the pick end to the rear.
Plates 1, VIII and IX show the component parts of the equipment, and Plate III an assembled set.
|
 |
|
Plate I |
 |
|
Plate III |
|
SECTION III. - TO ASSEMBLE THE
EQUIPMENT. |
As has been previously stated the design of the equipment, admits of variations in the relative positions of certain portions of it, but the normal arrangement will be as now described.
(1) Adjust the waist-belt until it is comfortably tight, taking care that when fastened the large buckle comes in the centre of the body in front, and that the
two smaller buckles are in a perfectly central position at the back., When the belt is fastened there should be about three inches of the running end clear of the buckle. The " outside " of the belt is the side on which the rear buckles are fixed.
(2) When the belt has been satisfactorily adjusted, lay it out on the ground, inside downwards and the large buckle to the right. Slip the bayonet frog over the tongue of the belt and bring it round to a position on the left hand side so that it will hang, when the belt is put on, upon the left hip.
(3) Attach the cartridge carriers on the outside of the belt by passing the double books over and under the edges of the belt. Their position on the belt may vary with each man, but speaking generally, the rear double hooks should be set close up to the rear buckles on the belt, the carrier will thus lie over the frog.
When the position has been determined, pass the small securing straps round the inside of the belt and snap them on to their
studs.
(4) Take one of the braces and secure one of its ends to one of the rear buckles on the belt, pulling it through the buckle until, in the case of an averagely tall man, it coincides with the fixed end piece on the
belt. Pass the other end of the brace (taking care not to twist it) through the cartridge carrier buckle on the
opposite side and pull it through until it coincides likewise with the fixed end piece. Repeat this operation with the other brace.
Although each of the braces is symmetrical, that is to say, is reversible fore and aft, it is essential that their sliding buckles should be on the rear part of the
braces, and so disposed that the open sides are directed inwards.
(5) Try the equipment on in its present state, getting into it as if it were a waistcoat. If it has been properly
fitted the belt should rest in its natural position all round the waist, while the braces should show no
slack in them. The latter will be crossed behind and come down vertically in front, while four end pieces will hang below
the belt on each side, two being to the front and two to the rear, and one of each pair on top of the other.
Make any necessary adjustments, then remove the equipment and lay it on the ground as before. Insert the bayonet and scabbard in the frog.
On many men the bayonet will be found to ride more comfortably if the
frog be worn on the belt between the two rear pockets of the lower row : in this case the rear
small securing strap cannot be passed round the belt, but this is not essential.
(6) Attach the carrier for the helve of the
entrenching tool, slip the rear loops of the carrier over the scabbard and slide the carrier up until the top edge of the buckle abuts against the bottom edge of the frog.
The strap connecting the two loops should be nearest to the hip. Buckle the carrier to the frog, taking care that the buckle is just below the frog and not between it and the thigh. Insert the
entrenching tool helve and close the snap fastening round it.
(7)
Attach the haversack by its large buckles to the two outer end pieces on the left-hand side. Adjust it so that it hangs in a convenient position on the left hip without interfering with the drawing or returning of the bayonet.
(8)
In a similar way attach the carrier for the head of the entrenching tool to the inner end
pieces on the right-hand side, adjusting it until it rests comfortably on the hip.
(9)
Then similarly attach the water bottle carrier (with the water bottle in it) to the outer end pieces on the same
side, and adjust both carriers until they ride comfortably. The free end of the vertical strap of the
water bottle carrier must be made secure by twisting it round the horizontal band to prevent the weight of the filled
water bottle drawing it through the loop.
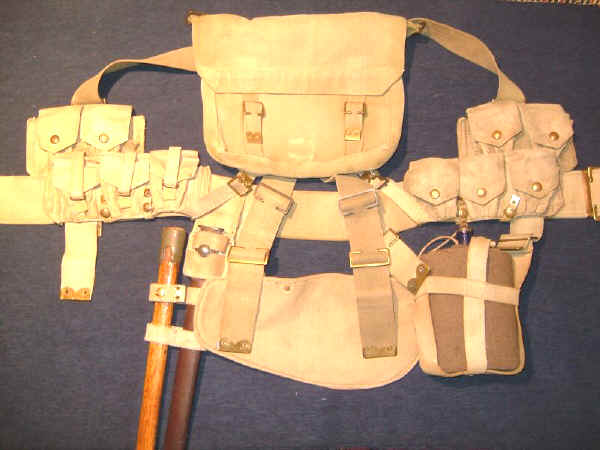
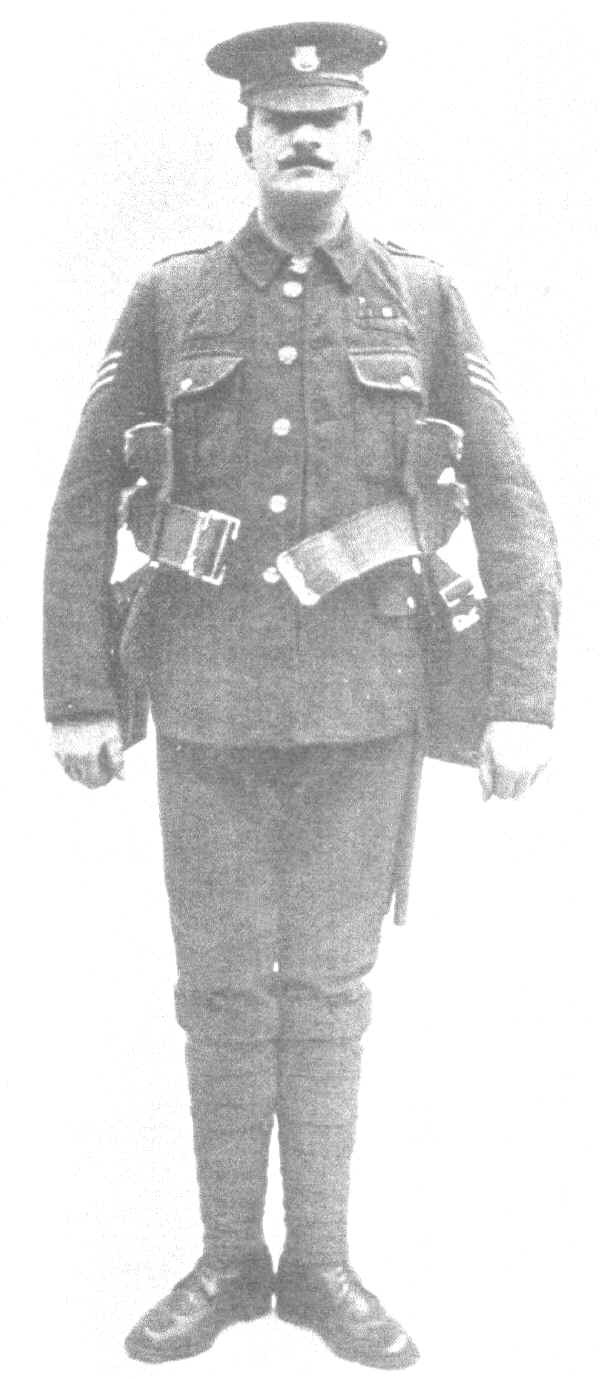
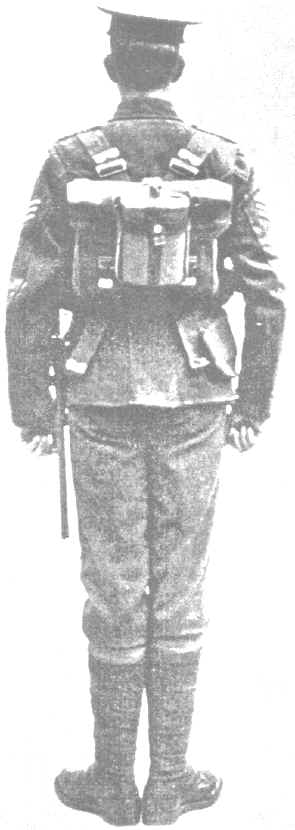
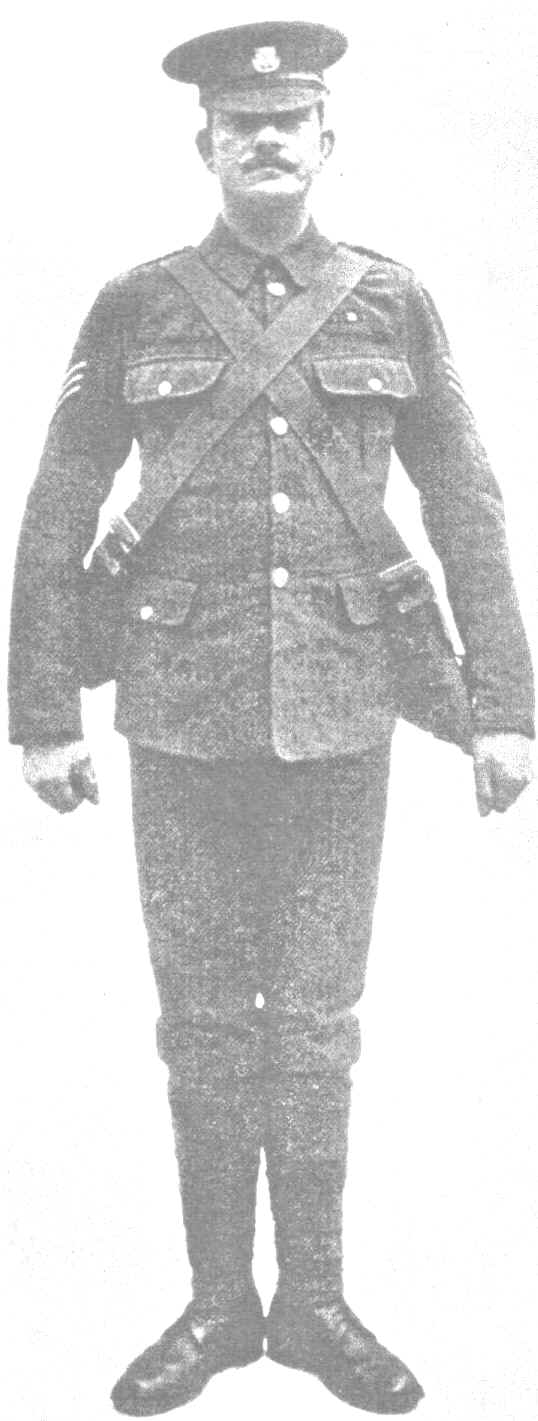
The equipment as it now stands represents the portion essential to fighting efficiency.
(Plate 4.) It will be known as
"marching order equipment without packs."
 |
|
Plate IV |
When the complete equipment is to be worn proceed as follows :
(10)
The table in the appendix details the articles which are carried in the pack, and they call for careful packing if a
neat and compact result is to be obtained. The mess tin should be the last article placed in the pack.
(11) Lay the assembled equipment face downwards on the ground and place the pack with the opening upwards upon it. Attach the buckle of one of the supporting straps to the carrier diagonal strap coming out from the back lower corner of one of the cartridge carriers, taking care that the buckle is as close up to the corner of the belt as possible. Pass the end of the supporting strap through the web loop
on the bottom of the pack and lead it diagonally across the front of the pack up to the small buckle on the opposite suspension tab. Pass it through the buckle, pull it as tight as it will go and secure it. Repeat the operation with the other strap
(Plate V).
|

|
|
Plate V Fig
I |
 |
As the correct balance of the equipment depends almost entirely upon these supporting
straps, it is very important that they should be as taut as possible, as they then bind
the pack tightly to the main body of the equipment and prevent it shifting.
(12) Adjust the
sliding buckles on the braces so that they come naturally to the point of attachment of the
securing tabs oil the pack.
Pass the tabs through the sliding buckles
of the braces ; if properly fitted the braces should now lie flat against the back of the pack, being neither slack nor in a state of strain, and the bottom of the pack should be on a level with the lower edge of the
waist belt.
The essential point to remember is that the weight of the pack is, in the
first instance at any rate, carried by the diagonal straps, attached to the carriers, and not by the securing tabs at the top
of the pack. The function of these latter is to keep the pack from
falling away from the body.
After a short time the weight of the pack slightly stretches the narrow end straps of the carriers, the weight then becoming partly transferred to the securing tabs.
If the whole or even the greater portion of the weight be allowed to be transferred to the
securing tabs, the essential merit of the design is sacrificed.
To OPEN THE PACK WHEN ATTACHED.
(13) Cast off the supporting straps from the small buckles attached to the securing tabs, loosen and open the cover.
TO RECLOSE THE PACK.
(14) Secure the cover and refasten the
supporting straps as before, taking care that they are drawn taut. If this is
not done the weight of the pack will hang from the shoulders, the most
important point to be avoided.
TO DISCARD THE PACK.
(15) Cast off the lower ends of the carrier diagonal straps and free the securing tabs from the brace buckles.
The pack will then drop off, the supporting straps remaining attached to it.
This is much more easily done when the whole kit is removed.
|
|
Plate V Fig
2 |
 |

|
| Plate
VI Fig 1 |
Plate
VI Fig 2 |
To PUT THE PACK ON AGAIN.
(16) See (11). The operations numbered 13 to 16
cannot well be carried out by the soldier unaided so long as the equipment is in position. Having regard,
however to the speed and facility with which the whole equipment can be taken off and put on again, it is a simple matter to slip the whole equipment off, carry out what is required, and replace it.
TO CARRY THE HAVERSACK AND WATER
BOTTLE ON THE BACK.
(17) Lay the equipment on the ground and remove the pack,
water bottle carrier and haversack. Secure the 1 inch diagonal end pieces of the cartridge carriers to the small
buckles at the lower corners of the haversack. Draw the sliding buckles down the braces until they come into a convenient position opposite the fixed ends of the tabs with brass tips at the top of the haversack. Secure these tabs to the sliding buckles. The
weight of the haversack should not be taken by these tabs, but by the lower corner buckles above mentioned. Lay the
water bottle carrier on the front of the haversack. If the water bottle carrier is provided with the snap fastener and the haversack with the corresponding stud, snap the fastener on the stud and secure. the extension piece on the carrier to the small buckle on the top of the haversack, pulling it well through.
If there be no snap fastener on the water bottle carrier, it horizontal loop is provided on the flap of the haversack. This latter arrangement is provided in the latest makes of carrier and haversack (see paragraph (4), page 7). Withdraw the extension piece of the carrier from the loop in the web piece running round the upper portion of the
water bottle, pass it through the loop oil the flap of the haversack, then through the carrier loop and secure it to the
buckle on the centre of the top of the haversack as before.
To CARRY THE WATER BOTTLE, HAVERSACK, OR
ENTRENCHING Tool, SEPARATE FROM THE REST 0F THE EQUIPMENT.
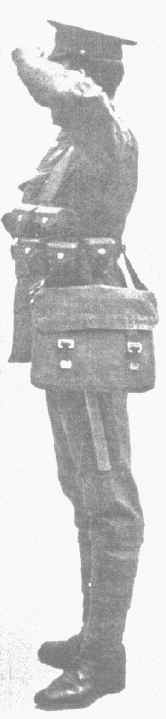
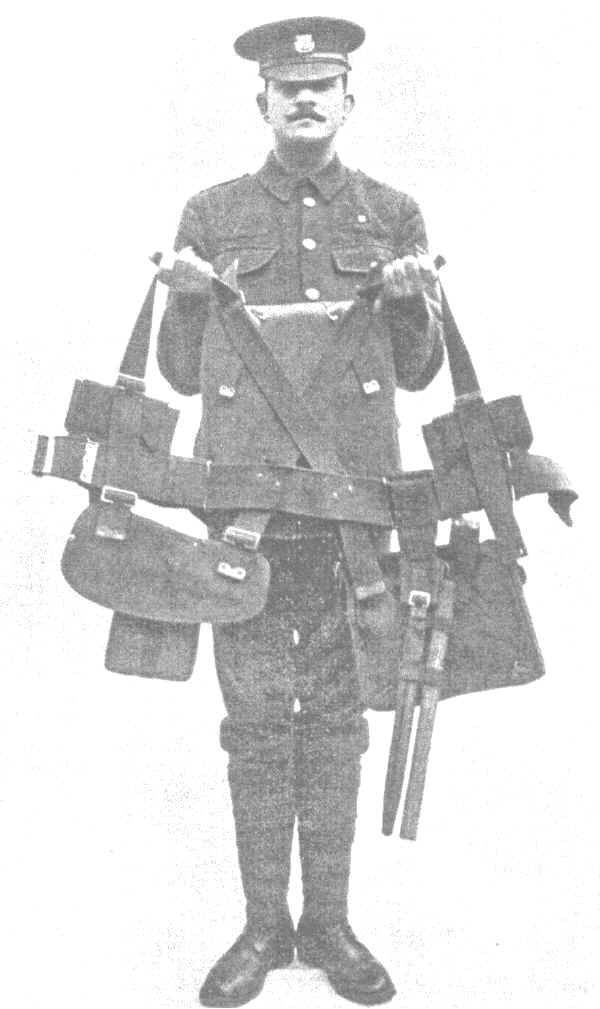
(18) Separate one (or both if required) of the braces from the rest of the equipment, and attach it (or them) by the ends to the article (or articles) which it is desired to carry. The ordinary method of slinging across the shoulder can then be resorted to.
(Plate VII.)
|
|
|
Plate VII |
|
SECTION IV.-CARE AND PRESERVATION. |
When the equipment has once been properly fitted to each man
it should be kept assembled as far as possible, although the pack need not always remain attached. It will be found convenient if,
when a correct fit has been obtained, a light mark is made to show where each
adjustment should always come. This saves trouble in case the equipment has to be taken apart and re-assembled.
Should the equipment become in a dirty or greasy condition, it may be washed, using warm water, soap and a sponge. Then rinse with clean water, and when thoroughly dry apply the cleaner in the manner laid down in the
instruction accompanying it. No cleaner may be applied to the equipment unless previously approved
by the War Office. A scrubbing brush should not be used on the equipment on any account. Dust and mud (when dry) should
be removed with an ordinary clothes brush. The metal work should not be polished but allowed to get dull, so as to avoid catching the rays of the sun.
Should the various straps be found to slip after they have become much worn the horns may be slightly
bent below the surface of the buckle : this bending must on no account exceed one tenth of an inch.
The component parts of the equipment will be marked in black, as was the case with the buff
accoutrements.
|
|