|
Battle
of the Coral Sea
May 4 - 10, 1942
John Crace
1902
A young Australian lad of 13 years and some 19,000k from home and family
entered the Royal Navy's midshipman training college moored on the river
Dart in Devon. He was admitted as a "Colonial Cadet" and rated
76 out of a total intake of 77. Each morning on rising, the lads were
doused with a bucket of cold seawater. After a very stringent course, John
graduated 47th some 18 months later.
Crace served in the Navy during World War 1, with distinction, including
sea time in HMAS Australia. Between wars, he specialised in torpedo
warfare and was the author of some excellent instruction manuals on the
subject of Naval warfare.
1939 John Crace, now Rear Admiral R.N., was seconded by the
Admiralty to take command of the Royal Australian Navy (Rear Admiral
commanding Australia Squadron).
At the outbreak of World War 2, the government of Australia placed our
Navy under the direction of the British Admiralty, thus giving Rear
Admiral Crace a most difficult task. He was on the point of asking for a
transfer back to the Royal Navy but a dramatic event forced him to
reconsider.
In December 1941, without any warning, the Imperial Japanese Navy, one of
the most formidable in the world, attacked and destroyed the U.S. Fleet
moored in Pearl Harbor. This was an act of unexpected aggression because,
at the time, the U.S.A. was not at war with anybody.
The U.S. Navy
1942
The U.S.A. immediately declared war on the Axis powers and assumed command
of "Anzac Area". The U.S. Navy high command awarded Rear Admiral
Crace sea going command of
H.M.A.S.
AUSTRALIA (Flag Ship)
H.M.A.S. HOBART (Cruiser) - the first R.A.N. vessel to have radar fitted
H.M.A.S. CANBERRA (Refitted at Sydney Naval Dockyard)
U.S.S. CHICAGO
U.S.S. PERKINS (Destroyer)
U.S.S. FARRAGUT (Destroyer)
U.S.S. WALKE (Destroyer)
U.S. Intelligence code breakers were able to confirm reports coming in
from the Australian coast watchers in the islands that the Japanese were
planning a seaborne invasion of Port Moresby, intending to isolate
Australia from the U.S.A.
The Crace command
May 7th, 1942
Rear Admiral Crace's ships were ordered to repel the Japanese invasion
group of 12 Transports, 5000 troops and Carrier Shoho at Jomard Passage,
the gateway between Japan's base at Rabaul and the Coral Sea entry. [Refer
to Map reference 151* East - 12* South and to Map reference 152* East -
10* South]
The U.S. Carrier Force under the overall command of Admiral Fletcher
proceeded up the Eastern coast of Bougainville to attack the Japanese
Carrier force, Shokaku & Zuikaku, stationed there to screen the
Japanese invasion force from U.S. Carrier attack.
The Background HMAS Sydney had disappeared without a trace, somewhere in
the Indian Ocean. HMS Prince of Wales and HMS Repulse, without any air
cover, were obliterated in Asian waters. This meant the staggering loss of
65,000 tons of fighting ships and the loss of life of 1540 Officers and
Seamen.
As if this loss was not terrible enough, the Japanese attack on Pearl
Harbor had ripped the heart and soul out of the U.S.Pacific Fleet. U.S.
losses at Pearl Harbour included 18 Capital war ships, 350 warplanes,
2,403 killed and 1,178 injured.
Japanese losses at Pearl Harbour included 185 killed, 1 prisoner of war
and one midget submarine lost.
The
Australian response
In
the days and weeks prior to May 7th 1942, the morale of the ships company
and the character and integrity of Rear Admiral Crace was to be sorely
tested. It seemed as though the Japanese would overrun the whole of the
South Pacific including Australia, India and the Aleutians, although Prime
Minister Togo, hours before his execution at wars end, as a War Criminal,
swore that the occupation of Australia was never a serious option. Even
so, North Queensland Railways saw fit to keep their locomotives under a
constant head of steam to ensure a quick evacuation of women and children
to safer regions down south.
In the wake of the Pearl Harbour bombing, Rear Admiral Crace realised that
Japanese Admiral Inoue had detected his presence at Jomard Pass and that
Inoue would be determined to wipe out the Australian Squadron completely,
using the Japanese base at Rabaul.
On the Bridge of HMAS Australia were Rear Admiral Crace, Flag Captain
Harold Farncomb, the ship's specialist Gunnery Officer, Torpedo Officer,
Navigating Officer and Officer of the watch. Captain Farncomb was to be
the fighting, aggressive and skilled seaman, at one with the ship and
complement, leading by example, into battle with the Imperial Japanese
Navy.
Crace's squadron, now known as Anzac Force, was exercising with New
Zealand's cruisers Achilles and Leander off the coast of Noumea when word
came through that HMAS Yarra and HMAS Perth had disappeared in Indonesian
waters without a trace.
Action
stations - May 7th, 1942
A
ship's company is worked out on the number of Officers and men in various
categories needed to fight the ship. On hearing the summons of the Bugler,
Seamen, Stokers, Cooks, Stewards, and all the other crew members close up
at their allotted station, ready to face the enemy.
At 1030 on May 7th, 1942, Rear Admiral Crace orders Action Stations and
the Bugler sounds this call over the Ship's broadcast system. Battle
stations - first degree of readiness - would have been about 10.30 am (in
Navy time that would show as 1030).
The first degree of readiness is assumed by closing all watertight doors
and hatches. The turrets, pom poms, machine guns, cordite and shell rooms,
first aid posts are all manned and ready for action. Damage Control
stations are under the control of the Damage Control Officer.
Doctors, male nurses and stretcher-bearers are on standby in the sick bay
forward and the Ward Rooms are converted into surgical theaters. In the
Boiler and Engine Rooms, the "Black Gang" are ready to
convert Bridge orders into more speed. On board is a Chaplain, ready to
support any personnel who may be wounded or dying. Meals are served under
battle conditions. Orders are transmitted via a bugle call to the crew
e.g. "Repel aircraft" will be sounded at the approach of enemy
aircraft, while Wheel and Engine room orders are transmitted by voice pipe
and telegraph.
The Officer of the watch, the Chief Gunnery Officer and the Navigation
Officer are all on high alert. The ships are steaming at 25 Knots (47 kph)
towards Jomard Passage to be there before sundown. Crace's squadron,
having re-fueled from the huge U.S. oil tanker, U.S. Neosho, two days
earlier on May 5th. were now completely alone, the U.S. Ships painted
battleship gray, and the Australian ships camouflage pattern, as a
background to the shimmering Coral Sea.
The
Japanese war machine
To
the north of Jomard Passage, the Japanese Imperial Navy had assembled a
force of
13
Transports
17 Destroyers
2 Mine Layers
10 Mine Sweepers
2 Submarine Chasers
5 Gun Boats
3 Air Craft Carriers
2 Oil Tankers
6 Submarines
150 Military Planes based at Rabaul
U.S.
Intelligence was able to decode Japanese signals that this fleet would be
deployed south from New Britain early in May 1942. Some of these ships
would be deployed towards Jomard Passage and some would engage U.S. forces
closer to Bougainville.
Meanwhile Japanese Admiral Inoue made ready to fly his attack planes down
from Rabaul to destroy Crace's Squadron, and two of the enemy Carriers was
less than 300k from Crace's position
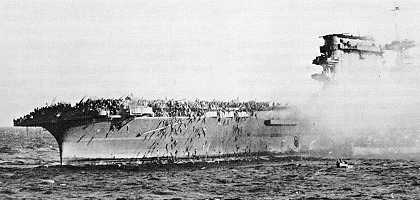
The Battle
Late afternoon that day a fleet of planes came into view, flying some 20
meters above the waves. Estimates were 21 Torpedo bombers usually armed
with one 800Kg. bomb or a torpedo having a war head of 500 Kg of TNT and
powered by a mix of liquid oxygen and air. They had an underwater speed of
90 kph and traveled a range of 20 kilometers with enough explosives to
sink almost any vessel.
As the Japanese bombs rained down on the squadron, Captain Farncomb was
skillful enough to manoeuvre HMAS Australia away from spots where enemy
bombs fell 10 seconds later. Steaming in a diamond pattern, head on to the
attackers, the squadron presented a difficult target. Each Captain took
his own evasive action with tremendous stress demanded from the ships'
engines. The call from the bridge for more revs from the engine room, and
calls for violent turns to port and starboard, almost reached the ships
overturning moment at times.
The engine room artificers soon realized that the popping sound they could
hear was of rivets failing in the ships side and seams opening up under
the machine gun strafing from above. The seamen on deck realized that the
buzzing sound about them was enemy bullets. The Anzac force retaliated
with every piece of firepower available. Soon the big 200mm guns were also
trained down low and hurling 120 Kilogram shells in the face of the attack
planes, creating huge walls of water in front of the low flying enemy
planes. This made their pilot's job almost impossible.
Most of us think that a gun turret is a nice smooth addition to a ship
with a couple of guns sticking out of it. Not so, a turret is a small
world of its own with up 10 men inside, bringing up shells from below,
cordite propellant taken from the wooden racks, loaders, a breech man
& Gunnery officer.
The right gun fired, belching smoke and fire out of the barrel as well as
the projectile. The gun recoils as the man sweat and ventilation needs ran
high. The left guns projectile had come up from below, and was eased into
the loading tray and the rammer did the rest, and the charge went in -
left gun ready, gun layer firing salvos.
The enemy planes roared in, to be repelled by anti aircraft Guns, pom poms
firing 40mm rounds and Oerlikon six-barrel 13mm rounds. All the while air
borne torpedo attacks were mounted against the Australians watching in
horror as the wake of the torpedoes swished past the ships, one actually
passing under the U.S.S. Chicago. HMAS Hobart had a huge hole blasted in
her smoke funnel and suffered casualties.
The Japanese planes had barely retired as ineffective, when suddenly a
flight of high-level bombers appeared. These rained down 225 Kilogram high
explosive bombs on the Australians. This caused massive waterspouts,
higher than the bridge level when the bombs fell close by, but missed
their targets thanks to the skill of the ships seamen. Men on the bridge
were drenched to the skin but no real harm was done.
As the skies cleared, it was realized that the bombers were Queensland
based American B17's. The US forces denied that this ever happened. Strict
radio silence prevailed throughout the Allied forces with the result that
the Battle of the Coral Sea was over before the rest of the Allied forces
knew anything about it.
Further East, U.S. Carrier forces were engaging the Japanese Carrier
screen [Refer to Map reference 156* East - 11* South], planning to protect
Port Moresby from any Japanese invasion.
An
Australian Victory
The
Japanese Port Moresby Invasion group (Operation M.O.) were now thoroughly
confused by Anzac Forces' stubborn refusal to be "done away
with". Uncertainty about the fate of their Carriers caused Admirals
Tagaki and Goto to withdraw from battle, possibly for the first time in
1000 years.
Rear Admiral Crace continued to patrol the Jomard Passage area until May
10th, 1942. At this time he received a congratulatory signal from U.S.
Admiral Fletcher on his forces great victory. Crace then returned south in
order to provision and refuel. In the meantime the Japanese Commander in
Chief Admiral Yamamoto, furious at his Admirals retreat, ordered them back
into battle. Too late, the Anzac force had moved on, the Japanese plan to
capture Port Moresby was in chaos.
Japan was later to mount an overland assault on Port Moresby and the rest
is history!
We
are grateful for American intervention in the Battle of the Coral Sea but
the fact is that only the ANZAC force stood in the way of a Japanese
capture of Port Moresby and the complete isolation of Australia from the
rest of the world. Not only that, this action and the Coast Watchers,
together with our Intelligence staff and support teams, weakened Japanese
strengths at the later Battle of Midway.
Copyright
2001 Gavan Casey
|