|
The
Bougainville Campaign 1944-1945
An account of the Militia at war
By Anthony Staunton
 |
The
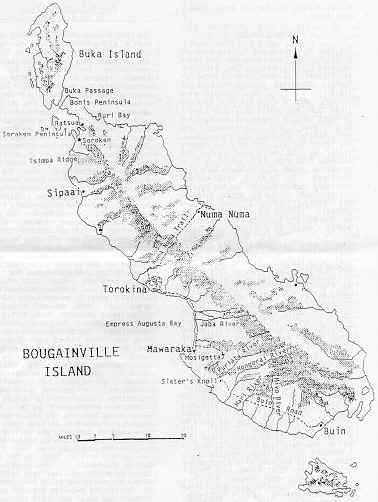
largest of the Solomon Islands is Bougainville. It is 120
miles long and 40 miles in width at the widest part.
The mountain chain which
forms its backbone rises to 9,000 feet at Mount Balbi, an
active volcano.
The main population areas
are in the southeast and east in wide flat country with high
forest and dense undergrowth covering the rest of the island
to the 4500 foot contour; here scantier moss forest begins.
The temperature is generally
hot and humid although the beaches are pleasantly cool at
night.
|
|
Units making
up II Corps.
|
| 7th
Brigade |
3
Div |
9th, 25th and
61st Battalions |
| 11th
Brigade |
5
Div |
26th, 55/53rd
and 31/51st Battalions |
| 15th
Brigade |
3
Div |
24th, 57/60th
and 58/59th Battalions. |
| 23rd
Brigade |
5
Div |
7th, 8th and
27th Battalions |
| 29th
Brigade |
3
Div |
15th, 42nd and
47th Battalions |
On 1 November 1943, the US 3rd Marine
Division landed at Torokina on the northern side of Empress Augusta Bay
and secured the beachhead. The Marines were relieved by the US XIV Corps
on 15 November. In March 1944, a full scale Japanese offensive against
the American positions was repulsed but the Americans did not extend
their perimeter further and were in the same positions when the
Australian II Corps under the command of Lieutenant General Stanley
Savige took command in December 1944. In late 1944, the Americans
estimated that 12,000 Japanese remained in the islands, the Australians
estimated that 25,000 remained but in fact there were 40,000 of whom
8,000 were in the forward area.
The two US Divisions on
Bougainville were replaced by four Australian brigades, the 7th, 15th
and 29th Brigades of the 3rd Australian Division and the 11th Brigade. (The
force was designated II Corps) The 15th
Brigade had some 16 months operational service by the time it reached
Bougainville. All were militia brigades that had seen heavy fighting in
New Guinea.
The militia was the pre-war
citizen forces which had been called up for full time duty and was
separate from the AIF which had been specially raised in 1939 for
overseas service. By 1945 many militia soldiers had volunteered for the
AIF and when 65% of a unit had volunteered, the unit was entitled to be
called an AIF unit.
Eight of the 12 battalions in
these brigades were Queensland units - all the militia battalions from
that State. Although reinforcements were sent to battalions without
regard to the state in which they were raised, more than half of the men
in each unit still belonged to its home State. The burden of the
Bougainville campaign thus fell particularly heavily on Queenslanders.
 The Bougainville Campaign was controversial, particularly with
the troops. It was seen as a 'political' campaign that was not
any benefit to the objective of defeating Japan. Just a clean
up operation. The 42nd Battalion History reads;
"In the first place the campaign was futile and
unnecessary. At Salamaua the men went for the Jap because
every inch of ground won meant so much less distance to Tokyo.
But what did an inch or a mile mean on Bougainville? Nothing !
Whether Bougainville could be taken in a week or a year would
make no difference to the war in general. Every man knew this.
The Bougainville campaign was a politicians war and served no
better purpose than to keep men in the fight....Every risk
taken on Bougainville was one that could not be avoided; every
life was begrudged. Men fought because there was no
alternative. None wanted to lose his life on
Bougainville....but despite all this the men did fight and
fought well".
The Bougainville Campaign was controversial, particularly with
the troops. It was seen as a 'political' campaign that was not
any benefit to the objective of defeating Japan. Just a clean
up operation. The 42nd Battalion History reads;
"In the first place the campaign was futile and
unnecessary. At Salamaua the men went for the Jap because
every inch of ground won meant so much less distance to Tokyo.
But what did an inch or a mile mean on Bougainville? Nothing !
Whether Bougainville could be taken in a week or a year would
make no difference to the war in general. Every man knew this.
The Bougainville campaign was a politicians war and served no
better purpose than to keep men in the fight....Every risk
taken on Bougainville was one that could not be avoided; every
life was begrudged. Men fought because there was no
alternative. None wanted to lose his life on
Bougainville....but despite all this the men did fight and
fought well". |
Numa Numa Trail
The main Japanese force was
concentrated in the south of the island but it was in the central sector
along the Numa Numa trail that the Australian campaign opened. The Numa
Numa trail traversed the island from the Torokina perimeter along a
gorge, up an escarpment then along a saddle of the main range to the
east coast. The 9th Bn (7th brigade, 3rd Division) relieved the
Americans above the escarpment on 22 November 1944 and a week later
captured the nearest Japanese position. With both air and artillery
support, the next position, arty Hill, was taken on 18 December when the
Japanese left 25 dead.
The 25th Bn relieved the 9th Bn and
took the next feature, Pearl Ridge a few days before the 11th Brigades
took over the central sector on 1 January 1945. The Australians could
now see the sea on both sides of the island from the newly won positions
but were restrained from advancing further and held their positions
while heavily patrolling the forward areas. Each of the battalions of
the 11th Brigade did a tour of four to six weeks in the central sector -
the 26th Bn until 2 February; the 55th/53rd Bn until 15 March; and the
31st/51st Bn until 18 April. The second battalion of the brigade during
this time was in the northern sector and the third was resting.
In April 1945, the 23rd Brigade (7th,
8th and 27th Bns), having moved to Bougainville from the outer islands,
replaced the 11th Brigade in the central sector. The 27th Bn patrolled
deeply but was under orders not to attack in strength. In six weeks, it
made 48 patrols and killed 122 Japanese for the loss of 4 killed and 9
wounded. The 7th Bn relieved the 27th Bn in June and was given a more
active role. Advancing from Pearl Ridge, the 7th Bn attacked and
captured a series of Japanese positions. It took McInnes Hill in August
and used strong patrols to probe deeply into Japanese territory.
From Kuraia to Soraken
In January 1945, the 31st/51st (11th
Brigade) advanced north from Sipaai and ran into the Japanese on Tsimba
Ridge, forward of the Genga River and some five miles south of Soraken.
On 6 February in an attack preceded by artillery and mortar barrages the
ridge was captured. The last pocket of resistance was not overcome until
the next day. 66 Japanese were killed in the fighting and 7 pieces of
artillery and 9 machine guns were captured. The Australians moved
forward with air and artillery support and captured the ridge
overlooking Soraken on 19 February 1945. Two days later, the 31st/51st
Bn which had suffered 34 killed and 19 wounded in six weeks of fighting
was relieved.
During March, the 26th Bn cleared the
Japanese from the Soraken Peninsula and nearby island in hard fighting
that obtained good observation of Soraken Harbour and Buka Island. In
early April 1945, the 26th Bn was relieved by the 55th/53rd Bn. It moved
towards Pora Pora with one company advancing along the coast and another
along an inland track. It pushed the Japanese back to a line from Ruri
Bay to Ratsua Inlet stretching across the neck of the Bonis Peninsula.
Late in May 1945 the 26th Bn relieved the 55th/53rd Bn and continued
northward but met opposition so stern that the 31st/51st Bn was again
brought forward. The Japanese doggedly resisted the Australians who by
now were weary and far below strength. On 8 June, a rein-forced company
of the 31st/51st, in 6 landing craft, tried to outflank the Japanese by
landing behind the lines at Parton but was forced to withdraw after 48
hours, having lost 23 killed and 106 wounded.
Bonis Peninsula
The 11th Brigade was relieved at the
end of June by the 23rd Brigade which was ordered to contain the
Japanese in the Bonis Peninsula and to patrol towards Buka passage.
Initially, the 8th and 27th Bns operated on separate sides of the
peninsula but deadly Japanese raids ambushed ration parties and cut
signal wires behind Australian lines.
On 21 July 1945, the 27th Bn recorded
that it had suffered 10 killed and 34 wounded in the previous month
although it had made no forward movement. Approval was given on 22 July
for the 23rd Brigade to concentrate on a 3,000 metre front around the
Buoi plantation. On 23 July, the 8th Bn with air and tank support
attacked a ridge that the Japanese had strongly entrenched. Next day,
another attack was halted by heavy fire from well camouflaged positions
until a wounded 20 year old Private Frank Partridge dashed forward
knocking out one bunker and leading the attack against a second. He was
awarded the Victoria Cross. The Japanese later abandoned the position.
South Bougainville
The 3rd Australian Division was
given the role of destroying the Japanese in south Bougainville. In late
November 1944, the 29th Brigade (15th, 42nd
and 47th Bns) replaced the Americans north
of the Jaba River and began extensive patrols. On 28 December 1944 the
brigade was given the task of advancing south along the coast. The
Japanese resisted the advance but the Australians steadily gained
ground. By mid January 1945, the brigade had advanced 13 miles and
secured the coast as far south as Mawarak which was entered without
opposition on 17 January. The brigade was relieved on 23 January by the
7th Brigade (9th, 25th and 61st Battalions) which continued the advance
towards the Puriata River.
The 9th Bn advanced towards Mosigetta
against Japanese tactics of fighting from ambush positions flanked by
swamps and dense bush, mining the road, cutting signal wires and night
counter attacks. The Australians responded with mortar and artillery
fire but if this failed, wide and deep outflanking moves were made.
Although losses were not heavy, conditions were extremely uncomfortable
and there was a constant sense of danger. The 61st Bn linked up with the
9th Bn at Mosigetta on 17 February 1945 and by 1 March patrols from both
battalions and a detachment of the 25th Bn had reached the Puriata River
along a wide front.
|
Slater's Knoll
The 25th Bn crossed the
Puriata River on 4 March 1945 and soon ran into heavy Japanese
resistance.
The Battalion established its
base close to where the Puriata converged with Buin Road at
Slater's Knoll.
The Japanese were strongly dug
in along the Buin Road and fired some 600 shells at Slater's
Knoll in March 1945. A company advancing along Buin Road was
surrounded and persistently attacked for three days.
The 25th Bn attacked on a two
company front on 19 March and forced the Japanese back from
their positions to an extensive system of pill-boxes at a road
junction.
|
 |
On 22 March, after air and artillery
bombardments the new position was attacked. During the attack Corporal
Reg Rattey, using a bren gun and grenades, knocked out 4 pill-boxes. He
was awarded the Victoria Cross; the first won by a member of a militia
battalion.
Intelligence indicated that the
Japanese would launch a major offensive in April 1945 with the brunt
falling on the 25th Bn. The attack was prefaced by a series of raids on
the lines of communications and on troops in the rear. The positions of
the 25th Bn were probed and attacked from 27 March. The offensive
culminated with a major assault against Slater's Knoll on 5 April. In10
days fighting 620 Japanese were killed and about 1000 were wounded. The
7th Brigade was relieved after 10 weeks in the front lines during which
the 25th Bn suffered 10 officers and 179 other ranks killed and wounded.
A lull followed the Japanese
offensive. The Japanese were exhausted and the 15th Brigade (24th,
57/60the and 58/59th Bns) was not able to attack until the roads were
upgraded so that supplies could be brought forward. On 17 April, 15th
Brigade opened its advance with the 24th Bn on the Buin Road and the
57/60th on Commando Road. At first, resistance was light but as the
Australians neared the Hongorai River it stiffened with forward infantry
coming under frequent artillery fire causing casualties. After three
weeks of fighting to gain 7000 yards, the Hongorai River was reached on
7 May. The cost had been 120 killed or wounded; 169 Japanese dead were
counted.
From the Hongorai River to the Mivo
River
The 15th Brigade patrolled deeply in
the middle of May with the main crossing of the Hongorai River beginning
on 20 May. The Japanese were forced from the ridge overlooking the river
and the main advance resumed on 2 June behind deadly air and artillery
bombardments. Patrols were on the Hari River by 5 June but when the main
body of the 58/59the advanced along the Buin Road it met heavy fire and
the tanks were delayed by boggy ground. Meanwhile, the 57/60th moved
along Commando Road and by mid June both battalions were beyond the
Hari. The Japanese put up a strong defence in front of the Mobia River
which was reached on 25 June. The next objective was the Mivo River
which was reached by a series of wide flanking moves carried out with
few casualties. However, many minor battles were fought by the 15th
Brigade between the major ones and its losses were heavier than any
other brigade on Bougainville - 32 officers and 493 men killed or
wounded.
During the 3rd Division advance from
the Jaba River to the Mivo River, the 2/8th Commando Squadron protected
its flank. Further inland, the AIB, led by Australians but with native
guerrillas, created a reign of terror among the well-armed and trained
Japanese troops. It is estimated that this force killed over 2,000
Japanese in eight months of operations. The 29th Brigade came back into
the front lines and was to cross the Mivo River on 3 July but continuing
heavy rain caused a series of postponements. Before the offensive could
be launched, active patrolling ceased in all sectors of Bougainville on
11 August. A Japanese envoy entered Australian lines on 18 August but
Australian minesweepers at Moila Point were fired upon on 20 August and
the Japanese commander waited until the surrender at Rabaul in New
Britain on 3 September 1945 before surrendering his Bougainville
command.
- It is estimated that 65,000
Japanese were on the islands when the Americans attacked in late
1943. A year later when the Australians took control the number had
shrunk to 41,000 although this number was twice the Australian
strength. During the Australian Bougainville campaign 8,500
Japanese were killed in action or died of wounds and 9,000 died of
disease or illness. 23,500 Japanese surrendered to the Australians
in September 1945.
- During the whole of the
Bougainville campaign, 516 Australians were killed or died of wounds
and 1,572 were wounded.
|