 |
|
|||
|
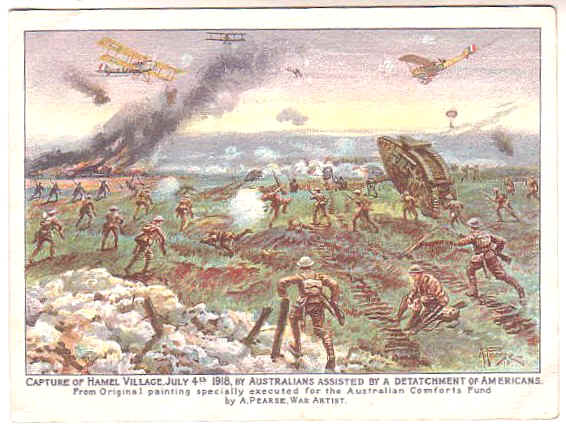
Battle of Le Hamel, 4th July 1918 |
-
ANZACS & ARMOUR
-
with additions by the webmaster
 |
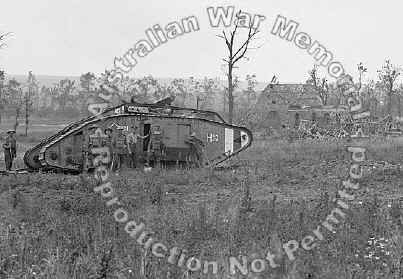
A tank
conducting mopping up operations in a ruined street of the village, the
day after its capture by troops of the 11th Australian Infantry Brigade.
This tank was subsequently put out of action when a shell hit and smashed the offside track. |
|
The Australian victory at Hamel was seen at the time as no more than a successful large scale raid. It was however, a complete vindication of Lt. General Monash's tactical methods - which would bear fruit a month later in the "Black Day" for the German Army at Amiens. J.F.C Fuller commented that no other battle of the Great War could compare with Le Hamel for rapidity, brevity and completeness of success - it was all over in 93 minutes.
Hamel fell to the Germans on 4th April 1918, creating a salient in the British line before Amiens with good observation from the ridge positions the Germans held. The task of recapturing Hamel was allocated to the Australian Corps and its commander, Lt. Gen. Monash, drew up a plan for a limited attack mounted along a 6000 yard front to a depth of 2500 yards, using just eight battalions of infantry supported by two tank battalions. There would be no pre-barrage to give the Germans fore-warning, instead tanks would advance hand in hand with the infantry, shooting them onto their objectives. Re-supply would be carried out by machine for the first time and not the sweating labour of hands otherwise removed from battle - re-supply tanks would carry stores and 100,000 rounds of ammunition, dropped by parachute. The expected strongpoints of Vaire and Hamel were to be overcome by special detachments while the troops for the final objective passed them by on either flank. The task was to be achieved by the 4th Brigade of Maj. Gen. Sinclair MacLagan`s 4th Australian Division, with 11th Brigade of 3rd Australian Division and 5th Army Tank Brigade under command. Support for the operation included : 2nd, 3rd, 4th and 5th Australian Heavy Machine Gun btns (111 Vickers HMGs) ; 326 field guns and howitzers; 302 heavy guns and howitzers: 8th Sqdn RAF and 3rd Sqdn AFC to bomb infantry, guns and transport at zero hour + 30: 205th Sqdn to bomb rear areas: 9th Sqdn RAF to drop ammunition by parachute at pre-arranged points or by ground signals. The flanks of the attack were to be protected by the 6th Brigade (21st & 23rd Btns only) of 2nd Australian Division on the southern shoulder and 2 companies and a platoon from 15th Brigade north of the Somme.
Hamel Defences Hamel was held by the German 13th Infantry Division (13th, 15th & 55th Regts); and 202nd Reserve Regt of the 43rd Reserve Division: nine battalions in all, deploying over 300 machine-guns and 26 trench mortars. Hamel village and what remained of Hamel and Vaire Woods were strongly fortified, but the German front line consisted of only one continuous trench with no shell proof dugouts and comparatively little wire. There were no communication trenches to the reserve trench or to the remainder of the defences, which consisted mostly of shell holes and short, shallow lengths of trench. In Support: one field gun battery within the German position, whilst heavier guns which significantly failed to take any part in the battle were concentrated in the Lamont-Cerisy valley.
Over The Top Zero Hour was 03:10 on the 4th July. Six minutes before, the Australian troops moved silently out of their trenches and into No Man`s Land. As watch hands moved onto Zero the British artillery crashed down onto the German trenches. After a whirlwind of steel which lasted just four minutes the field guns ceased their bombardment of the forward positions and began a creeping barrage - lifting 100 yards every 3 minutes. The tanks and infantry began an advance which was initially unopposed. The Germans caught completely by surprise by the assault, the brevity of the barrage, and the presence of tanks. In almost all cases the defenders of the first line were still lying in the bottoms of their trenches or sheltering from the shell fire in makeshift dugouts. In any case visibility was down to only 20 yards due to mist and smoke. On the left the 11th Brigade`s objectives were to take Hamel village and re-establish the old French trench line beyond, which descended to the marshy ground of the Somme Canal east of Bouzencourt. The 42nd & 43rd AIF Battalions encountered little resistance, except from the vicinity of Pear Trench, and once the front line had been taken the 44th AIF Battalion passed through and divided into two prongs, each supported by 6 tanks ; One prong moving against Hamel and the other working south towards 4th Brigade. The 43rd, with a further six tanks, followed to mop up in the village. Resistance crumbled before the 'Diggers' relentless advance and the final objective was secured between 04:45 and 04:55. The German reposte didn't materialise until 09:00 in the shape of the reserve battalion of 202nd Reserve Regt. However, well laid artillery fire and continual strafing attacks broke up the German concentrations. It was only finally late in the evening before a desultory attack was made against the end of the ridge east of Hamel, which was easily beaten off.
The Right Flank On the extreme right the 21st AIF Battalion of 6th Bde secured the flank of the attack without encountering serious opposition. Eleven minutes later the German front-line succumbed to the men of the 13th AIF battalion accompanied by six tanks. Hardly pausing, the battalion left the German front-line and advanced onwards past the southern flank of the Bois de Vaire, with a narrow front of only 400 yards. One company was deployed to form the leading wave, followed by two companies each on a two platoon frontage with the remaining platoons in lines of sections, ; the fourth company was in reserve. Machine-gun fire against the left-hand company was quickly silenced by the tanks, and the machine-gun positions taken at bayonet point. A strongpoint which held up the right-hand company was suppressed by fire from the tanks, and 80 prisoners taken. This was the last opposition before the Reserve Trench fell to a combined assault by tanks and infantry. 16th AIF Battalion's task was to clear the Bois de Vaire and Bois de Hamel. The six tanks accompanying the 16th Battalion were placed in pairs at each flank and in the centre. Strong opposition was encountered at the edge of Bois de Vaire but was quickly overcome with the majority of the fighting taking place inside the two woods, where the Germans had created several strong-points and dozens of machine-gun nests. With the aid of Lewis gunners firing from the hip to expedite the capture of the woods, opposition was crushed in just an hour and a half. The 15th AIF Battalion had the toughest time. Before the battalion's first wave reached the wire in front of Pear Trench, the barrage lifted giving the German machine-gunners time to re-man their weapons. To make matters worse, not only had the bombardment left the wire intact and trenches practically unscathed, but the three tanks detailed to tackle this tough nut, lost their bearings in the mist and smoke. In the face of intense machine-gun fire the 'Diggers' cut the wire and overwhelmed the defenders in a fierce bayonet attack. Shells falling short from the British barrage caused a few casualties and one of the tanks was knocked out. The next obstacle was Vaire Trench, where the III Battalion 55th Regiment put up a stout defence. A determined assault, again at point of bayonet, cleared opposition. The 15th Battalion rallied, but before it could advance further suffered more casualties from strongpoints on either flank. The tanks advanced to deal with the strongpoints, one led directly to an annoying German machine-gun post by a Captain Hawkswood, wearing hunting jacket and and 'pink' breeches. 12 resupply tanks passed arrived on the position, with ammunition, water and entrenching stores. Enfilading machine-gun fire from the enemy's reserve line, caused further losses and at the final objective there was a fierce struggle with elements of I Battalion 55th Regiment. A solitary tank followed by swearing ANZACS crushed resistance. With the assistance of one of the tanks the triumphant Aussies consolidated with resistance all but being over by 0700. There was one last final act as, a large force of Germans had established itself in front of the newly won positions. So teams of Lewis gunners and bombers pushed forward throughout the morning and drove the Germans back.
Casualties British: 5 tanks disabled (13 crew wounded), of which only two failed to reach the final objective. 775 Australians (mainly walking wounded) and 134 Americans killed or wounded. A further 102 Australian casualties incurred north of the Somme. 5 RAF bombers shot down. German: No exact figures, but possibly 1,500 casualties (III Bn 202nd Reserve Regt ceased to exist). 1472 men were captured, and a further 631 men north of the Somme. 200 machines guns were destroyed by the tanks, 171 machine guns captured with another 15 north of the Somme. Two field guns, 26 trench mortars, and two 13 mm A/T rifles were captured, 5 fighter aircraft and a balloon were shot down. |