 |
The
11th Brigade, AIF, action in
The Battle of Broodseinde,
(3rd
Ypres or Passchendaele)
4th October
1917,
special reference to 42nd
Bn
Research by Richard G Crompton |
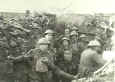
| Broodseinde
Ridge, Belgium. 5 October 1917. Broodseinde
Ridge was seized by the 1st, 2nd and 3rd Australian, and 7th British
Division on 4 October, that day's action being known as the 'Battle
of Broodseinde'. The New Zealand Division simultaneously seized the
`Abraham Heights' to the north west. The photograph was taken on 5
October and shows the 24th Battalion in trenches near 'Flinte Farm'
beyond the crest of the ridge looking down on the woods (in the
middle distance) to which the Germans had been driven. Celtic Copse
can be seen in the background.
|
An abstract
and adaptation from:
Bean,
CEW, 1933, ‘The Official
History of Australia in the War of 1914-18, Vol IV, The AIF in France
1917’, Angus and Robertson, Sydney - Chapter
XX Third step – Broodseinde pp 833
with
photos from the AWM
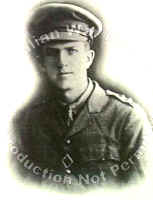 |
Major Phillip
Llewellyn Howell-Price DSO MC MID (1894-1917).
He was commissioned as a 2nd Lieutenant
in 1st Bn AIF and served at Gallipoli in August & September 1915.
|
|
|
| He
was Mentioned in Despatches for work in the Lone Pine battles. He
also fought at Armentieres, France, 1916-06 for which he received
the Distinguished Service Order, the Somme in July, Flers in November
and at Bullecourt in 1917-03. He was awarded the Military Cross and
was later to die at Broodseinde,
Belgium on 1917-10-04. |
|
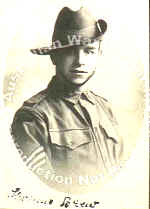
Sergeant
(later Lieutenant) Thomas Brew DCM of the 2nd Battalion, AIF, who
was killed in action at Broodseinde, Belgium, on 4 October 1917.
(Donor Mrs M. Brew) |
THE FIRST
PHASE
The II ANZAC
Corps – the New Zealand and the 3rd Australians – had only just
begun to leave the far back areas at Lumbres and the date of the third
step [of the Ypres offensive] depended on how quickly they could be
brought up and make their preparations.
For II ANZAC, with short notice of its task, the preparatory work
was much more difficult.
During
September 27 ANZAC pioneers and engineer were largely engaged in
extending the duckboards along the tracks for the approach march, but
there was nowhere time to lay them the whole way, and the roads prepared
for the artillery could not be planked.
 |
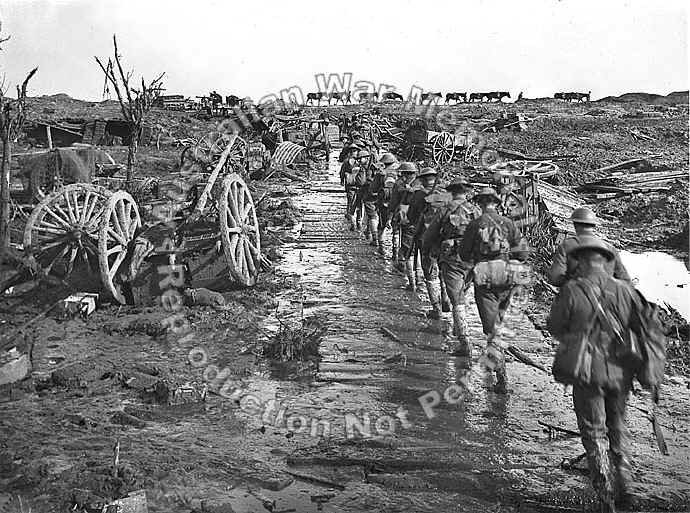
Men and pack
mules rounding Idiot Corner, on Westhoek Ridge, in Belgium, moving up to
the front line. To follow the duckboard and corduroy track was to be
seen silhouetted against the skyline, both from the Australian position
and that of the enemy - before he was driven from Broodseinde Ridge. But
passage over any part other than the top of the ridge was impossible
owing to mud. At this point many transports and guns were wrecked by the
constant shellfire, and others were lost in the morass.
One vehicle actually sank out of sight in the ooze a little to the right
of the picture.
|
On September
29, when 3rd Australians began to come in next to I ANZAC, [but] foot
tracks and the telegraph installations were not nearly as advanced as
for I ANZAC.
By October 1
the two ANZAC Corps had adjusted their inner boundary between them,
shifting it to the Ypres-Rouliers railway.
Each of the
three Australian divisions had a task [of] an advance of 1,200-2,000
yards on a 1,000 yard front. The
coming attack was to be made in two stages, the troops advancing to the
line – known as the ‘Red Line’ – 100-200 yards short of the
crest, and then, after about an hours pause, rushing the crest and
pushing forward to a ‘Blue Line’ – 200-400 yards beyond [what is
now Tyne Cot Cemetery]. …
As the railway veered to the north before cutting through the crest, the
right division of the 3rd Division would, in the second stage, have to
cross it diagonally.
 |
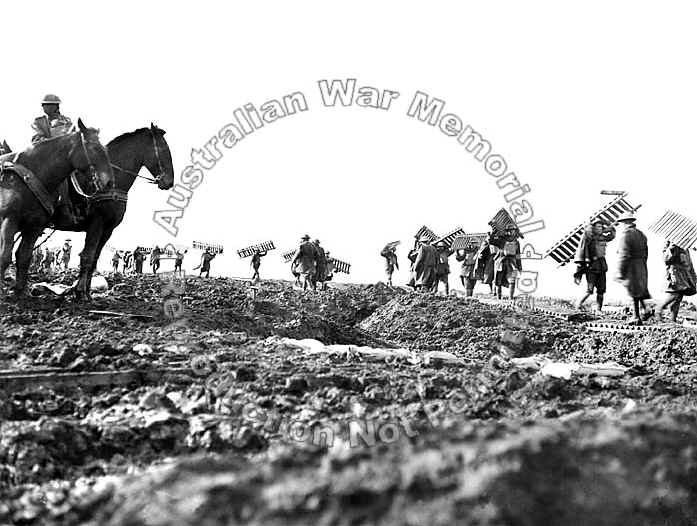
Pioneers
of the 1st Australian Division preparing a duckboard track over the
muddy waste near Zonnebeke, in the Ypres Sector, the day after the
Australian attack on Broodseinde Ridge. |
General
Monash arranged for the 3rd Division to have two intermediate
objectives, making four in all, and used one battalion for each of them.
The weather
was uncertain, and the slight misty rain in the afternoon of October 3
gave some warning of the difficulties to be faced when the fine spell
broke.
The
preliminary bombardment … consisted largely of practice barrages with
which, from October 1 twice daily, each corps swept the ground of the
attack and the area beyond. No other intense bombardment was to fall until ‘zero
hour’ – 6 o’clock on the morning of the 4th – when the whole
orchestra would strike up and the infantry would simultaneously advance.
| Broodseinde
Ridge, Belgium. 5 October 1917. The Headquarters of the 24th
Battalion, established in a dugout on Broodseinde Ridge, the day
following the capture of the Ridge.
Troops of the 1st, 2nd and 3rd
Divisions took a conspicuous part in the operations.
|
 |
The moon,
which was full, was hidden, and, from the point where the duckboards
ended, the tracks, although excellently marked with tapes and stakes,
were difficult, especially in the Zonnebeke valley, which lay close
behind the jumping-off tapes for the 3rd Division.
Its engineers had bridged the swampy beds at seven points with
duckboards. Some of the
crossings had been destroyed by shellfire but most of the 10th and 11th
Brigades, which had to pass, found them and those who could not
struggled through the bog. The
Germans close ahead were constantly firing white flares and coloured
signals. … the approach of the 3rd Division was under direct
observation from Windmill Cabaret Hill [Hill 40] and was delayed by
necessary halts when white flares went up.
… The
space for the 3rd Division’s assembly ahead of the Zonnebeke was very
narrow, and General Monash gave his brigadiers leave to hold back the
battalions destined for later objectives.
The 41st Battalion was accordingly given an assembly area besides
11th Brigade Headquarters, 1,200 yards in rear. [However because of
constant German barrage the 41st squeezed behind 10th Brigade.]
 |
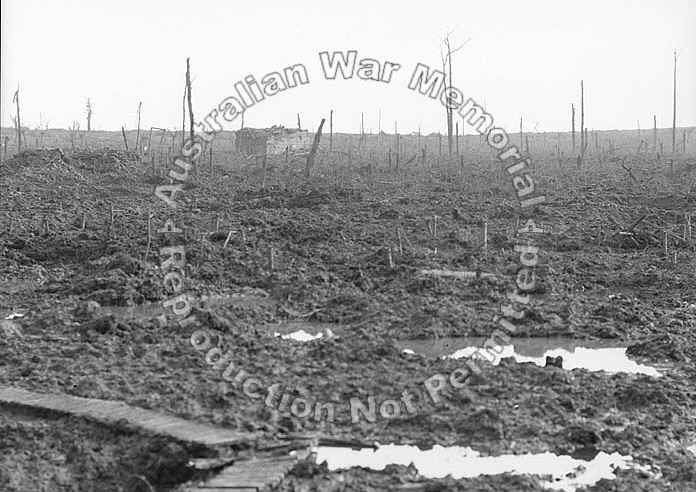
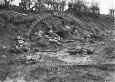
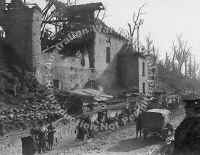
Scarcely
anything was left at Remus Wood, except mud and shattered tree
stumps, after the battle for Broodseinde Ridge, in the Ypres Sector.
The German pillbox in the central background, alongside a well,
withstood the shells. To the left of the photograph (which was taken
the day following) is a sunken hedge full of German dead; whilst the
duckboard track shown in the bottom left hand corner, leads to the
crater in Broodseinde Ridge.
|
On the right
the troops were very close to the enemy.
The night was quiet until shortly before dawn. ‘At about 5.20
… a yellow flare went up, instead of a white (as heretofore).
It was followed by a couple more and then a sheaf of them …
About seven minutes later, the German barrage began to come down,
battery by battery. By 5.30
it was really heavy…. Of course we thought that the attack had been
discovered. …’
Most of the
forward battalions suffered least; where there was room the rear lines
edged forward to escape the worst of the storm.
Most of the men, lying in shell holes with waterproof capes drawn
over their heads against the rain, simply had to endure it.
‘Then (at
6am) our barrage opened – tremendous …’
An officer
of the 43rd described [the barrage] as ‘like a wall of fire’.
The battalions of the 3rd Division … [followed] it more or less
in one crowded line at the outset, the rear waves pressing upon the
front ones in their haste to avoid the enemy’s barrage.
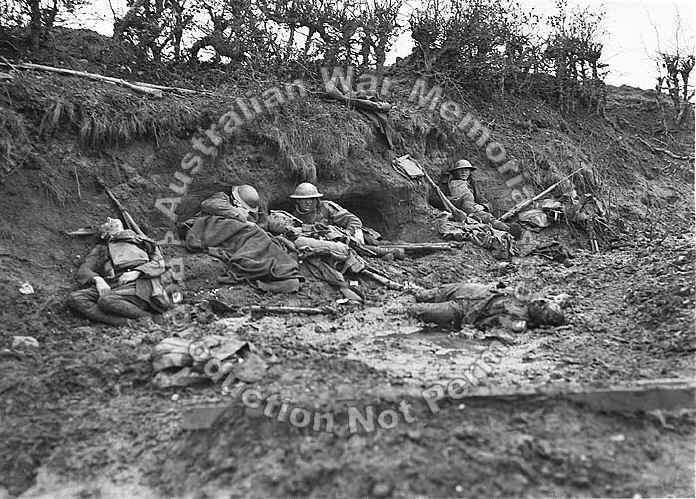
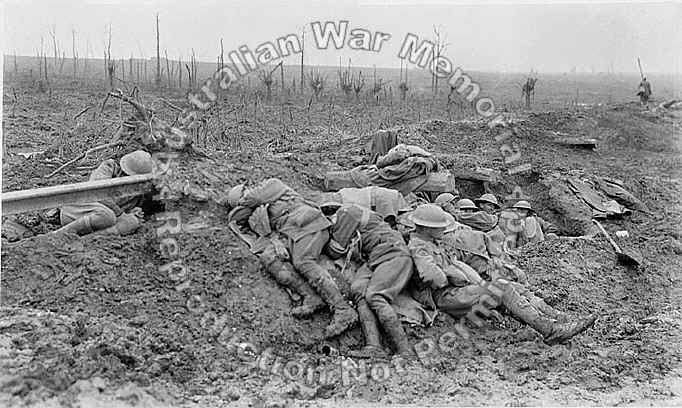
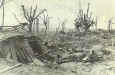
| Dead
and wounded Australian and German soldiers in the railway cutting on
Broodseinde Ridge.
The Australian soldier, wearing a tin hat,
slightly left of centre is Private Walter Radley, 60th Battalion
|
 |
The 43rd, which led the right brigade, met the Germans at
once from the crest of Windmill Cabaret ridge, [Hill 40], where this had
not been seized on September 26th. On the right a machine gun opened up
from a pill box near Zonnebeke station, on the left some posts threw
bombs from the hilltop. All
were quickly suppressed, the Germans on the crest fled.
At this stage … in the 42nd Lieuts JP Kelly-Healy and WH Comper
were killed.
| Webmaster's note.
It was at this point that 805 Sgt CFW Harris of D Coy of the
42nd took
command of the Platoon and led it for the rest of the attack.
The award of the MM was a result. |
I ANZAC
troops moving forward [to catch up with the creeping barrage saw] moving
objects which immediately after were recognised as another line of troop
who were also just rising from the shell holes.
Most of the Australians who saw them instantly grasped the fact
that these were German. … At some points the Germans were advancing
with bayonets fixed …
 |
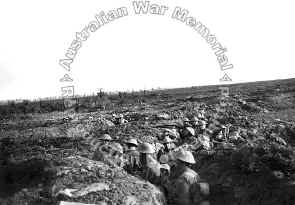
German
dead along their front line posts near Hannebeek, after its capture
in the Battle of Broodseinde on the Menin Road. The 5th, 6th and 7th
Brigades advanced over this area from Westhoek Ridge, which faintly
shows in the distance. The white line (across the centre of
photograph) is a tape track, a canvas strip about 2 inches wide,
indicating the direction the advancing infantry have taken, for the
benefit of those following behind.
|
Both
brigades swept over the crest and into the next valley, beyond which
rose Gravenstafel Ridge. On
the left there now occurred a splutters of firing around a pill box
(Israel House). German
bombs were bursting ten yards in front of the shooting Victorians, but a
party could be seen working round through a hollow.
Resistance ceased and the line swept on.
At this
stage, in order to allow the New Zealanders to cross the bog farther
north, the barrage rested for a double period, twelve minute, and
General Monash had therefore placed his first intermediate objective for
the 3rd Division. The two
leading battalions dug in, while the rest hurriedly reorganised, and
then passed through. On the right boundary of the division the railway began to
curve northwards on an embankment.
Through the boggy crater-field its track was always a main avenue
of communications, and shelters and pillboxes along it were now crowded
with Germans. Many were
brought in as prisoners by ‘mopping up’ parties, but some, with
hands above their head, ran in unsought.
 |
 |
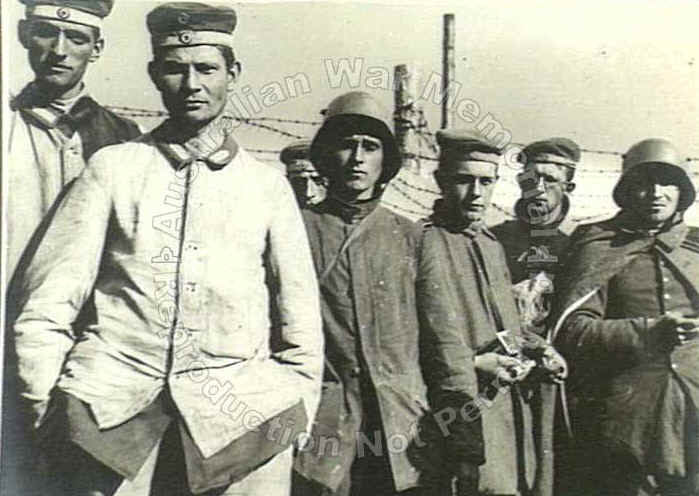
| German
prisoners in the compound at Hoograaf, after their capture by
Australians in the Battle of Broodseinde Ridge, in the Ypres Sector.
|
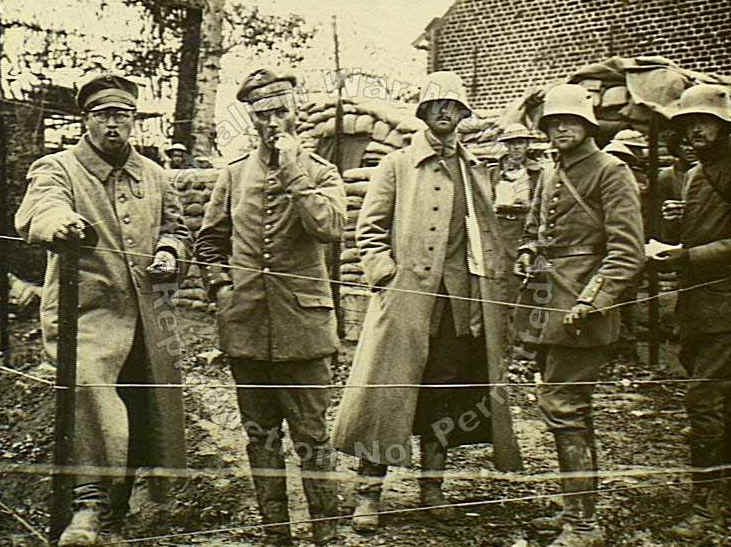
Passchendaele
Area, Belgium. c. 1917. A German Army Commander with his adjutant
and staff being held as prisoners of war at St Jean. This group were
captured in a dugout during the battle at Broodseinde. The Commander
is second from the left. (Donor British Official Photograph C2491)
|
After the
short halt the right brigade went on in excellent formation of section
columns, the 42nd (Queensland) Battalion leading.
Its right crossed the railway and reached the ‘Red Line’
after a little fighting.
Precisely on
the Red Line were two pillboxes known as ‘Thames’. As the barrage
lifted from these, Captain R Skinner (Geraldton W. Aust) and Lieut. RB
O’Carroll (South Brisbane), 44th Bn, who were then crossing the
railway, made for them. Files
of the 3rd Division’s right, picking their way through the bog and
stump of ‘Thames Wood’, found themselves being accurately followed
by whizz-bang shells.
 |
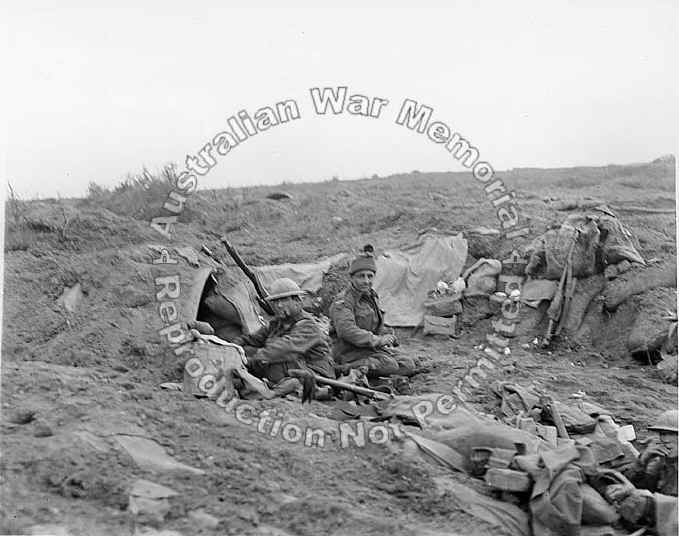
Three
unidentified Australians outside the type of shelter used by the
Australian troops in support at Broodseinde Ridge, in the Ypres
Sector, during the fighting on 4 October 1917.
Strewn outside the
shelter are guns, gas masks and water cans.
|
(The]
left,
however, was quickly held up by fire from the bed of the valley behind
Alma. Perceiving that a
dangerous gap had opened, the commander of the reserve company,
Lieutenant Dunbar, swung two platoons across the front of Alma, filled the vacant space,
and seized three pillboxes, which, if un-attacked, might have held up the
whole central division.
|
It was at Alma, and perhaps in
this attack, that John Henry Crompton died. |
As this
objective (the ‘Red Line’) was duly reached at 7.20, in the centre
of the 3rd Division, there was to be a halt until 8.10 for
reorganisation of the battalions destined to attack the summit.
But actually this pause saw some of the hardest fighting of the
day.
|
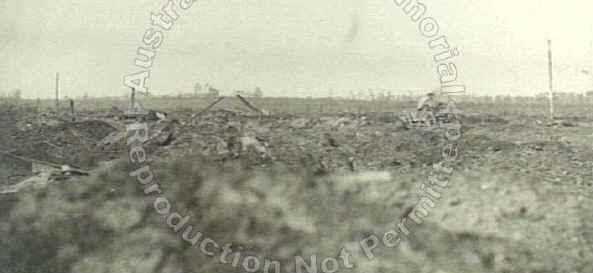
|
| The country
east of the Broodseinde Ridge, Flanders. View from Broodseinde over
the unshelled country beyond, into which the High Command determined
to break through in the attack upon Passchendaele, planned for 12
October. On the extreme right is a German captive balloon; on the
extreme left is the farm 'Assyria', in German possession.
|
THE
SECOND PHASE
The 3rd
Division attacked the junction of the ridge and the Abraham Heights spur
… employed only one battalion for the objective in each brigade
sector, but with another battalion leading the way within 200-300 yards
of the final objective and digging in there for close support.
The Flandern I Line (Dab Trench) ran diagonally across the ground
to be traversed. The right
brigade began to encounter it at once, and, crossing the old
wire-entanglements in swampy ground north of the railway, part of the
44th and 41st Battalions were unable to keep up with the barrage.
German pillboxes along the demolished trench brought machine-guns
into action. A pillbox,
‘Seine’, which proved to be another battalion headquarters, was
taken by Lieutenant Bremmar (44th) and some men working to its rear.
Another pillbox was fired on with rifle grenades and then rushed
by Lieutenant Fraser (41st), who thus set free the checked troops.
| The
Headquarters of the 3rd Australian Division at the Ramparts, at
Ypres, the day before the relief of the Division by the Canadians.
It was from here that the operations of the Division at Broodseinde
and Passchendaele Ridges were directed.
Note the ambulance in the
right foreground
|
 |
Both
battalions of the 3rd Division allotted for this task were amongst the
finest in the AIF, combining fighting vigour with a special degree of
orderliness, due to General Monash’s careful handling.
On the right the 41st (Queensland) reached with little difficulty
its objectives near Nieuwemolen cross-roads, the key of the ridge.
The 11th Machine Gun Company at once established there two guns
which, [and] together with … the Lewis guns of the 41st Battalion,
swept the slopes from Keiberg to the railway.
LATER
DEVELOPMENTS
North of the
railway line [where] the 41st had only been digging for twenty minutes
when the Germans were seen coming up in sections by rushes to the hedge
of Keerelaarhoek cemetery. … These Germans made some attempts against
Captain Valow’s company, and were driven off.
At about 11 o’clock another force appeared, coming down in
sections from the direction of Passchendaele, crossed the railway, and
settled into the old trenches 200 yards from the 41st.
… The Germans in front began to snipe sharply.
At 11
o’clock General Plumer gave consideration to a plan by which I ANZAC
would take over the 41st Battalions front south of the railway and
advance eastwards in cooperation with the right of II ANZAC.
General Monash, being consulted, agreed that the two leading
battalions had suffered severely, he might, by swinging right get a
better jumping off line for the next attack.
At 2 o’clock Plumer abandoned this idea.
At 10pm an
SOS signal brought down the British barrage.
The 44th Battalion was warned to have men ready to assist the
41st, but the 41st didn’t need them.
The German counterattack had not necessitated bringing forward a
single unit.
 |
Stretcher
bearers and dressers of the 9th Field Ambulance, asleep on the
railway embankment in front of Thames House, beyond Zonnebeke
Railway Station. The men are utterly exhausted, and have fallen
asleep in the mud at their relay post, in total disregard of the
cold, and drizzling rain which had just commenced to fall, and the
harassing shellfire of the enemy upon the Broodseinde Ridge area
where they were on battle duty. They
had worked sixty hours without rest.
|
AN
OVERWHELMING SUCCESS
The German
staff waiting on Broodseinde Ridge for news of the success of their own
enterprise at Zonnebeke had found their attack troops swept away, and
the waves engulfing themselves. The
subsequent throwing of two (3?)
counter-attack divisions (German 45th Reserve, 4th Bavarian and 25th Reserve
Divisions) against the ANZAC front failed to regain and inch of ground. The ANZAC troops, despite intense fire laid on them before the
start, had never fought better. ‘The
black day of October 4th’ the German Official History called it.
The losses
of the 11th Infantry Brigade at Broodseinde were:
|
Officers |
Other
Ranks |
| 41st Bn |
9 |
248 |
| 42nd Bn |
13 |
210 |
| 43rd Bn |
6 |
178 |
| 44th Bn |
13 |
193 |
| 11th
Machine Gun Company |
1 |
18 |
| 11th
Light Trench Mortar Battery |
0 |
8 |
| Totals |
41 |
855 |
Imperial
War Museum Reading Room, London, 14 January 2003
| Webmaster's note.
In Viet Nam Australia lost 500 good men in 10 years. In France the
42nd Battalion alone (one of over 60) lost 541 good men in 3 years, many of them at
Broodseinde. |
|