 |
| Category:
Colour patches |

|
|
|
|
|
|
Patches of HQ AIF, the
Australian Flying Corps, Light Horse & others
|
|
Index to Units on THIS
PAGE: Click the Links
|
| AIF
Headquarters Units |
Divisional
& Corps Mounted Troops |
Artillery |
| Australian
Flying Corps |
Anzac
Section Imperial Camel Corps |
Trench
Mortar Batteries |
| Australian
Light Horse |
Cyclist
Units |
Australian
Engineers & AE
Signals |
 |
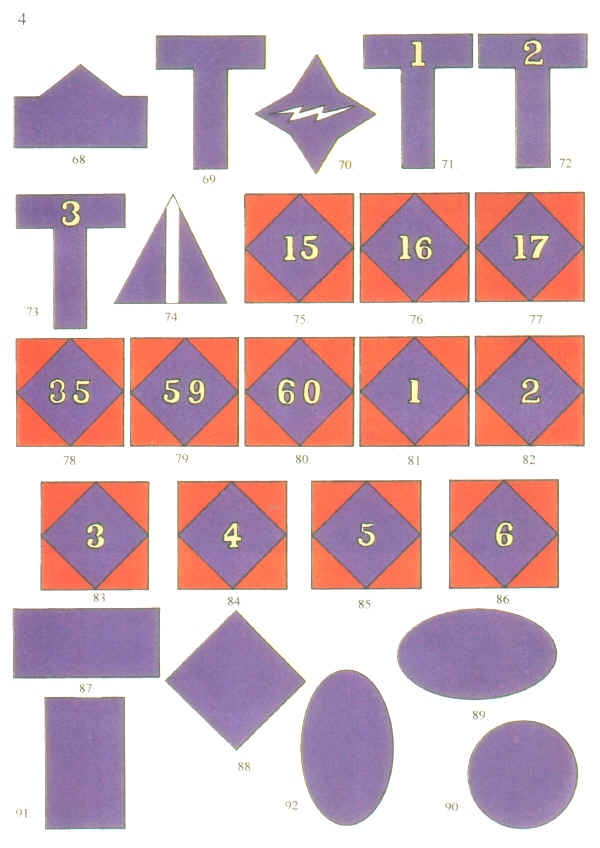
|
AIF Headquarters
Units 
|
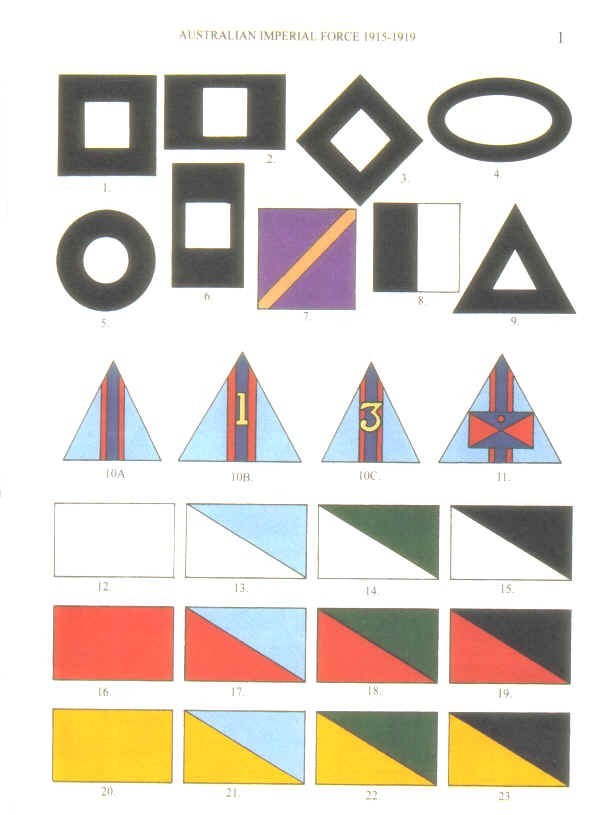
- 1 Headquarters 1st
Australian Division, 1916 - 1917 :
Auth. HQ A & NZ Forces CM No. 52, 20 April 1916. Superseded by
No. 2 in February 1917.
- 2. Headquarters 1st
Australian Division, 1917 - 1919: Auth.
Australian Imperial Force Order 488, 2.2.1917.
- 3. Headquarters 2nd
Australian Division, 1916 - 1919 :
Auth. HQ A & NZ Forces CM No. 52, 20 April 1916.
- 4. Headquarters 3rd
Australian Division, 1916 - 1919:
Auth. Australian Imperial Force Order 231, 26.8.1916.
- 5. Headquarters 4th
Australian Division, 1916 - 1919
Auth. HQ A & NZ Forces CM No. 52, 20 April 1916.
- 6. Headquarters 5th
Australian Division, 1916 - 1919
Auth. HQ A & NZ Forces CM No. 52, 20 April 1916.
- 7. AIF Administrative
Headquarters, 1916 - 1918 : Auth.
Australian Imperial Force Order 158, 16.6.1916. Superseded by No. 8
in February 1918. Officially referred to simply as HQ AIF.
- 8. (a) AIF Administrative
Headquarters, London, 1918 - 1919.
- (b) Australian
Headquarters, Egypt, 1918 - 1919.
Auth: AIF Order No. 1103, 8.2.1918.
- 9. Headquarters,
Australian Corps, 1918 - 1919 : Auth.
Australian Imperial Force Order 1317, 30,7.1918. Formed by
redesignation of Headquarters I ANZAC Corps on 24.12.1917.
- Note: No colour patches were approved for the
headquarters of the Australian and New Zealand Mounted Division,
the Australian Mounted Division nor Desert Mounted Corps. These
headquarters were formed from a mixture of Australian, New
Zealand, and British personnel, in the case of the Corps HQ many
of the Australian personnel performing dual roles on the staff
of Australian Headquarters, Egypt.
Initially raised in April 1915 as No. 1 Half Flight
AFC for service in Mesopotamia, No's 1 to 4 Squadrons AFC being raised
during 1916. Renumbering of these squadrons in the Royal Flying Corps
sequence of 67, 68, 69, and 71 commenced on 12.10.1916 for No. I
Squadron, and on arrival in England in January 1917, December 1916, and
March 1917 respectively for No's 2, 3, and 4 Squadrons. The official
history, Volume VIII, refers to them as (Aust.) Squadrons, R.F.C.,
however AIF Order 748, 13.7.1917, specifically designates them, and the
training units, as Squadrons, A.F.C.
The two training squadrons in England were designated
No's 29 and 30 Squadrons AFC, No's 32 and 33 being raised later.
Reversion to the original squadron titles occurred on 19.1.1918 in the
United Kingdom, the training squadrons also being renumbered at this
point. No. 67 Squadron AFC was redesignated 1st Squadron AFC in the
Middle East on 16.2.1918. By March 1918 the training organization in the
United Kingdom comprised the AFC Depot, HQ 1st Training Wing AFC, the
5th, 6th, 7th, and 8th (Training) Squadrons AFC, and the 1st Aeroplane
Repair Section AFC.
- 10A. Australian Flying
Corps, 1917 - 1919: Auth.
Australian Imperial Force Order 770, 27.7.1917.
- 10B. 1st Squadron, A.F.C.,
1918 - 1919: Unofficial variation,
numeral in brass.
- 10C.3rd Squadron, A.F.C.,
1918 - 1919: Example, Military
Heraldry Collection, Australian War Memorial. Unofficial variation,
numeral in brass.
- 11. Wireless Personnel,
A.F.C., 1918 - 1919: An unofficial
colour patch worn by Private P.L. Hughes, who served as a wireless
operator for duties in conjunction with artillery spotting from
aircraft.
- Two such personnel were allotted to each (Army)
Brigade AFA, five to the two Australian batteries of 36th Heavy
Artillery Brigade, and six to each Australian divisional
artillery. His tunic, bearing this colour patch, and on the left
cuff a wireless proficiency badge, is held in the Military
Heraldry Collection AWM as Item No. REL AWM 17291.001.
- 1st Australian Light Horse Brigade:
Auth. Aust and NZ Mounted Div. R.O. No. 1, para. 4, 18.10.1916.
Formed part of the Aust and NZ Mounted Division. No's 13 to 15
inclusive were approved and worn well prior to the promulgation of
this order, the earliest reference being "Distinguishing Marks
and Badges, AIF", of March 1916.
- 12. HQ
1st Aust. Light Horse Brigade, 1916 - 1919.
- 13. 1st
Aust. Light Horse Regiment, 1916 - 1919.
- 14. 2nd
Aust. Light Horse Regiment, 1916 - 1919.
- 15. 3rd
Aust. Light Horse Regiment, 1916 - 1919.
- 2nd Australian Light Horse Brigade
: Auth. Aust. and NZ Mtd Div. R.O. No.1, para. 4, 18.10.1916. Formed
part of the Australian and New Zealand Mounted Division.
- 16. HQ 2nd Aust. Light
Horse Brigade, 1916 - 1919.
- 17. 5th Aust.
Light Horse Regiment, 1916 - 1919.
- 18. 6th Aust.
Light Horse Regiment, 1916 - 1919.
- 19. 7th Aust.
Light Horse Regiment, 1916 - 1919.
- 3rd Australian Light Horse Brigade
: Auth. Aust. and NZ Mtd Div. R.O. No. 1, para. 4, 18.10.1916.
Formed part of the Aust. and NZ Mounted Division until February 1917
when it was transferred to the Imperial (later redesignated
'Australian') Mounted Division.
- 20. HQ 3rd Aust. Light
Horse Brigade, 1916 - 1919.
- 21. 8th Aust.
Light Horse Regiment, 1916 - 1919.
- 22. 9th Aust.
Light Horse Regiment, 1916 - 1919.
- 23. 10th Aust.
Light Horse Regiment, 1916 - 1919.
|
 |
- 4th Australian Light
Horse Brigade: Auth. Australian
Imperial Force Order 795, 10.8.1917. Originally raised in March
1915, comprising the 11th, 12th, and 13th Light Horse Regiments.
Disbanded in July 1915 and reformed in February 1917 as part of
the Imperial (later redesignated 'Australian') Mounted Division.
Colour patches for all units of this brigade were initially
approved by Anzac Mounted Division Letter No. 31/27 of 14.3.1917.
HQ AT then granted approval for all except No. 24A on 9.6.1917,
approval for 24B in lieu being given on 3.7.1917.
- 24A. HQ 4th Aust.
Light Horse Brigade: Although
approved in Egypt, HQ AIF directed on 9.6.1917 that a new
design would have to be submitted as this design was already
in use with HQ 4th Aust. Infantry Brigade. It is understood to
have been manufactured as a result of demands submitted to
Ordnance but was not issued.
- 24B.
HQ 4th Aust. Light Horse Brigade, 1917 - 1919.
- 25. 4th Aust.
Light Horse Regiment, 1917 - 1919.
- 26. 11th Aust.
Light Horse Regiment, 1917 - 1919.
- 27. 12th Aust.
Light Horse Regiment, 1917 - 1919.
- In December 1918 the regiment
requested that future supplies of this patch be
manufactured in a lighter blue, however, it is
unlikely that these were made as advice was received
that no more indents would be submitted on Ordnance
for colour patches.
- 5th Australian Light
Horse Brigade : Auth. AIF Order
No. 1521, 21.1.1919. Raised on 1.7.1918 from Australian and New
Zealand components of the Imperial Camel Corps Brigade and was
allotted to the Australian Mounted Division. In early October 1918
HQ AIF was advised by Aust. HQ, Egypt, that it was proposed to
allocate the colour grey to the brigade, presumably in the
rectangular format already used by existing light horse brigades.
After strong recommendations from the units comprising the new
brigade it was then decided to retain the triangular shape used by
these units prior to their conversion from Camel Corps to Light
Horse.
The new design was approved by
the GOC AIF in Egypt in December 1918 (Ref, Aust. HQ, Egypt, Memo
No. 44577, 10.12.1918, AWM 10, item 4303/4/13). It should be noted
that the brigade colour was worn to the front, not as shown in the
Official War History. Major Treloar went to some lengths to
confirm this in correspondence with former officers of the
brigade's units, and advised the official historian's staff
accordingly. (Ref. AWM 93, item 12/3/11).
- 28. HQ 5th Aust.
Light Horse Brigade, 1918 - 1919.
- 29. 14th Aust. Light
Horse Regiment, 1918 - 1919.
- 30. 15th Aust. Light
Horse Regiment, 1918 - 1919.
- Note: AIF Order No. 1372, 13.9.1918, notifying
the formation of the 5th Light Horse Brigade authorised the
raising of the 16th Aust. Light Horse Regiment. This unit was not
raised, nor was a colour patch approved, despite the existence of
one postwar manufactured example in the Victoria Barracks
collection, and its appearance on a postwar colour patch chart
entitled Regimental Colours Australian Imperial Force 1914-1919,
but unacknowledged and undated. The third regiment of this brigade
consisted of the le Regiment Mixte de Cavalrie Du Levant, a French
colonial unit, which left the formation in October 1918.
- Allotted in 1914 on the basis of
one light horse regiment per infantry division, modified in March
1916 to one squadron only. Divisional squadrons were concentrated
into corps mounted regiments, one per Army Corps, in July 1916. No
mounted regiment or squadron was raised for the 3rd Aust.
Division.
- 31A. 4th Aust. Light
Horse Regiment, 1915 - 1917: Auth.
1st Aust. Div. Order No. 562, 8.3.1915. Superseded by No. 25
in August 1917.
- 31B. 2nd ANZAC
Mounted Regiment, 1916 - 1918; and
- XXII Corps
Mounted Regiment, 1918: Auth.
Australian Imperial Force Order 179, 25.7.1916. AIF
personnel of this unit were absorbed by the 13th Aust.
Light Horse Regiment in December 1918.
- Note: The 4th Aust. L.H. Regt. was raised in 1914
as the divisional regiment of 1st Aust. Division. In early 1916
'B', and later 'D' (see note 42 below) Squadron formed 2nd ANZAC
Mounted Regiment in France, the third squadron of this unit being
provided by the Otago Mounted Rifles (NZ). Both regiments retained
the same patch until the 4th Light Horse Regiment in Egypt was
brought up to strength and allotted to 4th Light Horse Brigade in
February 1917. It will be noted that a proportion of personnel of
both these regiments wore this patch with the red to the front
instead of white as authorised.
- Note 42. Raising authorised on 11.3.1916. At
that point a light horse regiment comprised only three
squadrons. 'D' Squadron was initially raised to replace 'B'
Squadron when that sub-unit became Corps Troops in France,.
but subsequently also joined 2nd ANZAC Mounted Regiment in May
1916. The 4th Aust. Light Horse Regiment continued to operate
in Egypt with two squadrons only until a new 'B' Squadron was
raised in February 1917.
- 32A. 13th Aust. Light
Horse Regiment, 1915 - 1916;
- 1st ANZAC Mounted
Regiment, 1916 - 1918;
- Australian Corps
Mounted Regiment, 1918 - 1919:
Auth. 2nd Aust. Div. Instruction, para. 2, 3.8.1915. Raised
initially as part of the 4th Light Horse Brigade but on the
disbandment of that formation in July 1915 it was re-allotted
to the 2nd Division. In March 1916 it was split up, 'A'
Squadron remaining with the 2nd Division, 'B' and 'C'
Squadrons being allotted to the 4th and 5th Divisions
respectively. It was concentrated again as I ANZAC Mounted
Regiment in July 1916.
- 32B. 1st ANZAC Mounted
Regiment: Auth. AIF Order No.
179, 25.7.1916. This order states that the 13th Light Horse
Regiment was to continue to wear its old patch, and the
accompanying drawing showing white to the front is possibly the
result of the failure of many AIF Orders to differentiate between
left and right arm patches.
- 33. 11th Aust. Light
Horse Regiment, 1916 - 1917: Auth.
HQ Aust and NZ Forces CM No. 17, 25.2.1916. Raised in March 1915
but in July was absorbed by the 2nd, 5th, and 9th Light Horse
Regiments to form the fourth squadron in each of those regiments.
Reformed in February 1916 as the divisional regiment of the 4th
Division, but was replaced in this role by 'B' Squadron,
13th Aust. Light Horse Regiment, in March 1916. Allotted to 4th
Light Horse Brigade in February 1917 and this patch was superseded
by No. 26.
- 34. 12th Aust. Light
Horse Regiment, 1916 - 1917 : Auth.
HQ Aust and NZ Forces CM No. 17, 25.2.1916. Raised in March 1915
but in July 1915 was absorbed by squadrons into the 1st, 6th, and
7th Light Horse Regiments. Reformed in February 1916 as the
mounted regiment of the 5th Division, but was replaced in this
role in March 1916 by 'C' Squadron, 13th Aust. Light Horse
Regiment. Served in an independent role until it was allotted to
the 4th Light Horse Brigade in February 1917. This patch was
superseded by No. 27.
- 35. 1st Australian
Battalion, Imperial Camel Corps Brigade, 1916 - 1918: Ref,
"Distinguishing Marks and Badges AIF", undated but
submitted for drafting on 14.3.1916, and line drawings under cover
of AIF Admin HQ Memo No. 26144, 31.10.1916. Appears in these
references as a 2 inch equilateral triangle.
- 36. 3rd Australian
Battalion, Imperial Camel Corps Brigade, 1917 - 1918:
- 37. 4th Anzac Battalion,
Imperial Camel Corps Brigade, 1917 - 1918:
- Note: The details for No's 36 and 37 have
been extracted from Sand, Sweat and Camels; The Australian
Companies of the Imperial Camel Corps, by Brigadier G.F.
Langley, formerly the CO of the 1st Camel Battalion and its
successor, the 14th Light Horse Regiment. Further reference
has been provided by Thomas and Lord, New Zealand Army
Distinguishing Patches 1911-1991, Part One, p.29, based on a
1917 Imperial Camel Corps Christmas card held in the New
Zealand National Archives Collection. The 4th Battalion
comprised two companies of New Zealanders and two of
Australians, while the 2nd Battalion, which the quoted NZ
reference has identified as wearing a black triangle, was
formed of British personnel. The brigade also included, in
addition to the Australian Camel Field Ambulance, the Hong
Kong Singapore Mountain Battery RGA, 10th Field Troop RE, and
26th (1st/3rd Scottish Horse) Squadron, Machine Gun Corps.
- 38. 1st Aust. Divisional
Cyclist Company, 1916 : Auth. HQ
ANZ Forces CM No. 52, 20.4.1916. Raised in March 1916, primarily
from reinforcements to the 4th Aust. Light Horse Regiment.
Absorbed by 1st ANZAC Cyclist Battalion in July 1916.
- 39 2nd Aust. Divisional
Cyclist Company, 1916 : Auth. HQ
ANZ Forces CM No. 52, 20.4.1916. Absorbed as No. 3 Company, 2nd
ANZAC Cyclist Battalion in July 1916.
- - 3rd Aust.
Divisional Cyclist Company, 1916: No
colour patch approved. Raised in Australia in March 1916,
absorbed by 1st ANZAC Cyclist Battalion in July 1916.
- 40. 4th Aust. Divisional
Cyclist Company, 1916 : Auth. HQ
ANZ Forces CM No. 52, 20.4.1916. Absorbed by 1st ANZAC Cyclist
Battalion in July 1916.
- 41. 5th Aust. Divisional
Cyclist Company, 1916 : Auth. HQ
ANZ Forces CM No. 52, 20.4.1916. Absorbed by 1st ANZAC Cyclist
Battalion in July 1916. The inset on all examples handed over to
the AWM after the Great War measure I and 1/4 inches high and 3/4
inch wide.
- 42. 1st ANZAC Cyclist
Battalion, 1916 - 1918;
- Australian Corps
Cyclist Battalion, 1918 - 1919: Auth.
AIF Order 179, 25.7.1916.
- 43. 2nd ANZAC Cyclist
Battalion, 1916 - 1918 : Auth.
AIF Order No. 179, 25.7.1916. Only one subunit, No. 3 Company
(formerly the 2nd Aust. Divisional Cyclist Company) was
Australian, the remainder of the battalion being drawn from the
New Zealand Cyclist Corps. In January 1918 the battalion was
redesignated as XXII Corps Cyclist Battalion and the Australian
element was disbanded. It subsequently became the New
Zealand-Cyclist Battalion. It is not certain if this patch was
worn by New Zealand personnel between 1916 and 1918, however NZEF
Order No. 495 dated 31.1.1918 authorised the battalion to wear a
patch of identical design with I and 1/2 inch sides in lieu of 2
inches as originally approved.43
- 44. HQ 1st Aust.
Divisional Artillery : Auth. I
Aust. Div. Order No. 562, 8.3.1915. Cancelled on 16.3.1915,
replaced by No. 45.
|
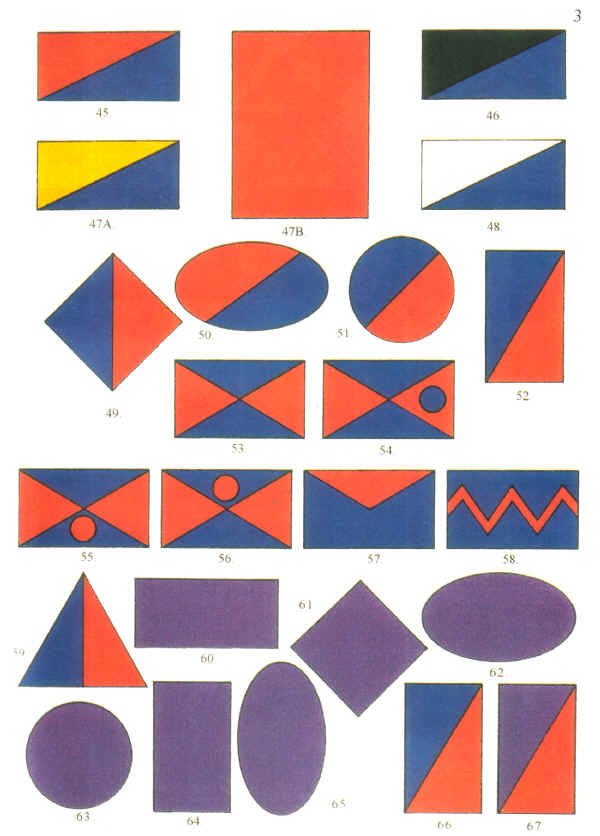 |
- 45. (a) 1st Aust. Field
Artillery Brigade: Auth. 1st
Aust. Div. Order No. 562, 8.3.1915.
- (b) 1st Aust. Divisional
Artillery, 1915 - 1919: Auth. I Aust. Div. Order No. 591,
16.3.1915. HQ 1st Divisional Artillery; HQ's 1st, 2nd, 3rd,
and 21st Field Artillery Brigades, 21st Howitzer Brigade; 1st,
2nd, 3rd, 4th, 5th, 6th, 7th, 8th, 9th, 22nd, 23rd, and 24th
Batteries; 101st, 102nd, 103rd, and 116th (Howitzer)
Batteries; Aust. Heavy Howitzer Battery; VIA Heavy Trench
Mortar Battery; XIA, YIA, ZIA, 1st, and 2nd Medium Trench
Mortar Batteries; 1st Divisional Ammunition Column; 1st, 2nd,
and 3rd Field Artillery Brigade, and 21st Howitzer Brigade
Ammunition Columns.
- 46. 2nd Aust. Field
Artillery Brigade: Auth. 1st
Aust. Div. Order No. 562, 8.3.1915. Cancelled on 16.3.1915 and
superseded by No. 45.
- 47A. 3rd Aust. Field
Artillery Brigade: Auth. 1st
Aust. Div. Order No. 562, 8.3.1915. Cancelled on 16.3.1915 and
replaced by No. 45.
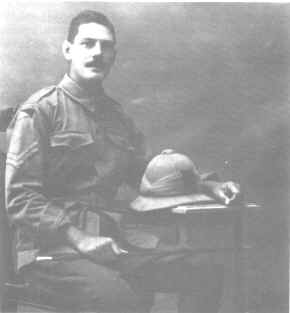 |
- 47B. 3rd Aust.
Field Artillery Brigade Ammunition Column, 1915:
Worn on the left side of the
puggaree of the Wolseley pattern helmet in Egypt by
members of this unit (see photograph).
- It is believed that this patch
indicated the wearer's arm of service, possibly predating
colour patches, and was based on the scarlet hat band worn
from 1912 by the artillery of the Citizen Forces in
Australia.
Photo courtesy Royal Australian Artillery
Historical Society of Western Australia. Corporal R Nowland C
Sub-section 3rd Aust Field Artillery Brigade Ammunition
Column, Alexandria Egypt 4 Sep 1915
|
- 48. 1st Aust. Divisional
Ammunition Column : Auth. I Aust.
Div. Order No. 562, 8.3.1915. Cancelled on 16.3.1915 and replaced
by No. 45.
- 49. 2nd Aust. Divisional
Artillery, 1915 - 1919 : Auth. 2
Aust. Div. Inst., para. 2, 3.8.1915. This instruction actually
refers in its opening paragraph to a single colour for HQ
divisional artillery, however this appears to be in error, and No.
49 was worn. HQ 2nd Div. Arty; HQ's 4th, 5th, 6th, and 22nd FA
Bdes, 22nd How. Bde; 10th, 11th, 12th, 13th, 14th, 15th, 16th,
17th, l8th, 19th, 20th, 21st Btys; 104th, 105th, 106th, and 117th
(How.) Btys; V2A HTM Bty; X2A, Y2A, Z2A, 3rd, and 4th MTM Btys;
2nd DAC; 4th, 5th, and 6th FA Bde, and 22nd How. Bde Amn Colms.
- 50. 3rd Aust. Divisional
Artillery, 1916 - 1919 : Auth.
Australian Imperial Force Order 231, 26.8.1916. HQ 3rd Div. Arty;
HQ's 7th, 8th, 9th, and 23rd FA Bdes, 23rd How. Bde; 25th, 26th,
27th, 28th, 29th, 30th, 31st, 32nd, 33rd, 34th, 35th, and 36th
Btys; 107th, 108th, 109th, and 118th (How.) Btys; V3A HTM Bty;
X3A, Y3A, Z3A, 5th, and 6th MTM Btys; 3rd DAC; 7th, 8th, and 9th
FA Bde, and 23rd How. Bde Amn Colms.
- 51. 4th Aust. Divisional
Artillery, 1916 - 1919 : Auth. HQ
ANZ Forces CM No. 17,
25.2.1916. HQ 4th Div. Arty; HQ's 1Oth, 11th, 12th, and 24th FA
Bdes, 24th How.
Bde; 37th, 38th, 39th, 40th, 41st, 42nd, 43rd, 44th, 45th, 46th,
47th, and 48th Btys; 110th, 111th, 112th, and 119th (How.) Btys;
WA HTM Bty; X4A, Y4A, Z4A, 7th, and 8th MTM Btys; 4th DAC; 10th,
11th, 12th FA, and 24th How. Bde Amn Colms.
- 52. 5th Aust. Divisional
Artillery, 1916 - 1919 : Auth. HQ
ANZ Forces CM No. 17, 25.2.1916. HQ 5th Div. Arty; HQ's 13th,
l4th, l5th, and 25th FA Bdes, 25th How. Bde; 49th, 50th, 51st,
52nd, 53rd, 54th, 55th, 56th, 57th, 58th, 59th, and 60th Btys;
113th, 114th, 115th, and 120th (How.) Btys; V5A HTM Bty; X5A, Y5A,
Z5A, 9th, and 10th MT M Btys; 5th DAC; 13th, 14th, 15th FA, and
25th How. Bde Amn Colms.
- 53. (Army) Brigades,
Australian Field Artillery, 1917 - 1918 : Auth.
Australian Imperial Force Order 488, 3.2.1917. Replaced by No's 54
to 56 in January 1918. Worn by HQ 3rd, 6th, and 12th (Army) Bdes
AFA; 7th, 8th, 9th, 16th, 17th, 18th, 45th, 46th, 47th Btys;
103rd, 106th, and 112th (How.) Btys.
- 54. 3rd (Army) Brigade,
A.F.A., 1918 - 1919: Auth. ATO
1059, 8.1.1918.
- 55. 6th (Army) Brigade,
A.F.A., 1918 - 1919: Auth. ATO
1059, 8.1.1918.
- 56. 12th (Army) Brigade,
A.F.A., 1918 - 1919: Auth.
Australian Imperial Force Order 1059, 8.1.1918.
- 57. Australian and New
Zealand Mounted Divisional Artillery, (see note 44
below) 1916 - 1918: Auth.
Aust. and NZ Mtd Div. RO No. 1, para. 4, 18.10.1916. Originally
comprised III Brigade RHA(TF), composed of the Leicestershire and
Somersetshire Batteries RHA (TF), and IV Brigade RHA(TF),
comprising the Inverness and Ayrshire Batteries RHA(TF). This
patch was selected from a number of designs after consultation
with the RHA brigade and battery commanders, who wished it to be
worn on the hat or helmet. On 20.6.1917 the Leicester Battery was
transferred from the division, the remaining batteries being
grouped as the XVIII Brigade, RHA(TF). The XIX Brigade, RHA(TF)
was allotted to the Australian Mounted Division and comprised 'A'
and 'B' Batteries HAC, and the 1st/1st Nottinghamshire Battery
RHA(TF). Advice has been received to the effect that 'B' Battery
HAC did not wear this patch, and it seems unlikely that any of the
other batteries of XIX Brigade RHA did either.
- Note 44 The 10th Battery, Australian Field
Artillery, was originally raised in August 1914 as part of the
1st Aust. Light Horse Brigade, but was disbanded in the
following month, thereafter all artillery for Australian
mounted formations was provided by the British Army.
- 58. 36th Aust. Heavy
Artillery Group, 1917 - 1918; and
- 36th Aust. Heavy
Artillery Brigade, 1918 - 1919: Auth.
AIF Order No. 1006, 7.12.1917. Raised from personnel of the
Royal Australian Garrison Artillery in May 1915 as the
Australian Siege Artillery Brigade (Heavy). Subsequent
reinforcements were drawn from the RAGA and the AGA. It was
initially redesignated '0' Siege Brigade RGA in September
1915, No's I and 2 Siege Batteries becoming the 54th and 55th
(Aust.) Siege Batteries RGA. (see note 45 below)
Designated 36th (Aust.) Heavy Artillery Group RGA in early
1916. Raising of a third battery, the 338th (Aust.) Siege
Battery, commenced in December 1916 however it was disbanded
in August 1917. In November 1917 the group was reorganized to
comprise a headquarters and the two Australian batteries
(renumbered No. I and No. 2 Aust. Siege Batteries in early
1918), the 155th and 353rd Siege Batteries RGA, and the 140th
and 15 1st Heavy Batteries RGA. This patch was allotted to
Australian personnel and units of the group only. In February
1918 Group HQ was redesignated HQ 36th (Aust.) Heavy Artillery
Brigade, RGA.
- 45 MO 573/1915, 28.9.1915. MO 325/1916
advised of redesignation to HQ 36th (Aust.) Heavy
Artillery Group and Australian Imperial Force Order 1102,
8.2.1918, to HQ 36 (Aust.) Heavy Artillery Brigade. Prior
to November 1917 it was common for both batteries to be
serving under command of other RGA brigades.
- 59. Australian Heavy
Trench Mortar Battery, 1918 - 1919 : Auth.
Australian Imperial Force Order 1149, 12.3.1918. Raised in March
1918 from the divisional heavy trench mortar batteries.
Distinguishing Colour Patches and Badges, Trench Mortar Batteries
In April 1916 trench mortar batteries were raised on the basis of
one trench mortar brigade (one heavy battery and three medium
batteries) per division, and one light battery per infantry
brigade. Heavy and medium trench mortar batteries were part of the
divisional artillery and in March 1918 were reorganized, with all
the heavy batteries being absorbed into one Corps heavy trench
mortar battery, while the medium batteries were reduced to two per
division. Light trench mortar batteries were raised from personnel
of the infantry brigade to which they were attached and initially
had a non-permanent establishment, i.e. officers were seconded
from their battalions for duty with the battery, while other ranks
remained on the establishment of their battalion and were shown as
'on command' of the battery for the period of their attachment to
it. In July 1917 other rank personnel of light TM batteries were
transferred to these batteries on a permanent basis.
HQ Aust. and NZ Forces CM No. 52, of 20.4.1916, and 3rd Aust. Div.
Inst., paras 8 and 9, of August 1916, directed personnel of heavy
and medium batteries to wear the colour patch of their respective
divisional artillery. Personnel of light batteries in Egypt were
directed by CM No. 52 to continue wearing the patch of the
infantry battalion from which they had been drawn. 'Me first
reference to the use of the infantry brigade headquarters patch by
personnel of light trench mortar batteries appears to be 3rd Aust.
Div. Inst., paras 8 and 9, of August 1916, although there is no
evidence that this affected the other four divisions at this
stage. First Aust. Division Standing Orders, 1917, Appendix IV,
published in July 1917, directed light TM battery personnel of
this division to wear the colour patch of their respective brigade
headquarters, and the colour plates included in Volume III of the
Official War History show it to be general throughout the AIF from
at least this point, which conforms to the transfer of personnel
from their original units to these batteries on a permanent basis
at that time.
AIF Order No. 787, dated 7.8.1917, approved the wearing of a
grenade, in blue worsted, on the right sleeve of the service dress
jacket, 1/2 inch below the unit colour patch, by members of trench
mortar batteries. This was a skill-at-arms badge only, issued on
the recommendation of commanding officers, and was worn only while
a member was serving with a trench mortar battery. It was not an
integral part of the unit colour patch as portrayed by the
Official War History. First Aust. Division Standing Orders, 1917,
Appendix IV, simply states that "T.M. Batteries wear a light
blue grenade in addition [to the respective colour patch].",
which may have led to occasional liberal interpretation of the
original authority. This distinction was initially approved by a
War Office Letter46 of January 1916, and would have first come to
the attention of the AIF as Mediterranean Expeditionary Force GRO
No. 791, dated 31.1.1916. The sole responsibility however for the
approval of badges worn by Australian units rested with the GOC
AIF, and it is significant that no mention of this badge is made
in HQ A & NZ Forces CM No. 52 which approved distinguishing
patches for trench mortar batteries of the AIR There is no
particular evidence that use of the grenade commenced officially
in the AIF prior to DAG AIF approval on 28.7.1917, and indeed the
3rd Aust. Div. Inst., para. 8, of August 1916, directed that
members of its trench mortar batteries were to wear the letters
'T.M.' in a wreath in white worsted embroidery on the cuff of the
left sleeve.
War Office Letter 20, General No. 1145, QMG 7. British Army
Proficiency Badges: Edwards and Langley, p.64. The authority
quoted however by AIF Order No. 787 is GRO 1364, undated but
possibly also early 1916, issued in France, not Egypt. A
photograph of a badge bearing the letters 'T.M.' in a wreath,
embroidered in white on khaki and possibly that approved by the
3rd Aust. Division, appears as unidentified on page 127 of British
Army Proficiency Badges, the authors having been unable to locate
an official British Army authority for it.
- 60. 1st Aust. Divisional
Engineers, 1915 - 1919 : Auth. 1
Aust. Div. Order 562, 8.3.1915. 1st, 2nd, and 3rd Field Companies.
- 61. 2nd Aust. Divisional
Engineers, 1915 - 1919 : Auth. 2
Aust. Div. Instr. para. 2, 3.8.1915. 4th, 5th, 6th, 7th, and 8th
Field Companies.
- 62. 3rd Aust. Divisional
Engineers, 1916 - 1919: Auth.
Australian Imperial Force Order 231, 26.8.1916. 9th, 10th and 11th
Field Companies.
- 63. 4th Aust. Divisional
Engineers, 1916 - 1919 Auth. HQ
ANZ Forces CM No. 17, 25.2.1916. 4th, 12th, and 13th Field
Companies.
- 64. 5th Aust. Divisional
Engineers, 1916 - 1919 Auth. HQ
ANZ Forces CM No. 17, 25.2.1916. 8th, 14th, and 15th Field
Companies.
- 65. 6th Aust. Divisional
Engineers, 1917 : Auth. AAG AIF
Letter 15/42, 25.5.1917. Comprised the l6th and l7th Field
Companies, raised in March and April respectively, and disbanded
in July and September 1917 respectively.
- 66. (a) 1st Field
Squadron, AE, 1916 - 1919 : Auth.
Aust and NZ Mtd. Div. R.O. No. 1, para. 4, 18.10.1916. According
to the Corps history, this unit was known for a period as the
Anzac Field Squadron. This colour patch is not known to have been
worn by NZ personnel of the squadron, even after a separate New
Zealand Field Troop was raised as part of the unit in August 1917.
- (b) Imperial Field
Squadron, RE, (Australian personnel), 1917; and
- 2nd Field Squadron,
AE, 1917 - 1919 : In use from
February 1917 by 3rd Field Troop AE (formerly 'C' Field Troop,
1st Field Squadron AE), and possibly the newly raised 4th
Field Troop AE. The headquarters and two other troops of this
squadron were originally British. Became the Australian Field
Squadron on 20.6.1917 with the addition of the 5th Field Troop
AE, and was redesignated 2nd Field Squadron AE in November
1917.
- (c) 'D' Field Troop
and Bridging Train, AE, 1917 - 1919 : Raised
in September 1917 as 'D' Troop, a corps engineer unit under
the administrative command of 1st Field Squadron AE, becoming
an independent unit with change of designation in May 1918.
- 67. Field Squadrons
A.E., Mounted Divisions : Ref
Appendix to the Official History of Australia in the War of 1914 -
1918, Vol. 111. No official authority or reference can be located
to confirm that this replaced No. 66 at any stage, nor are samples
held by the AWM. A copy of the Aust. and NZ Mtd Div. RO No. I of
18.10.1916 has been sighted by this writer bearing a handwritten
initialled note dated 5.11.1948 [?] stating that No. 67 was worn
in lieu of No. 66 by all squadrons and troops however its author
has failed to leave any evidence supporting his statement.
|
 |
- 68. 1st Army Troops
Company, Aust. Engineers, 1917 - 1919 : Auth.,
Australian Imperial Force Order 969, 9.11.1917. Raised by
reorganization and re-designation of the 16th Field Company.
- 69. Australian Mining
Corps, 1916; and
- Tunnelling
Companies, AE, 1916 - 1917 : Auth.
Australian Imperial Force Order 152, 2.6.1916. Originally
created in October 1915 as a mining battalion with a
headquarters and three companies. In May 1916 HQ AIF directed
that in future these three companies would be employed as
separate tunnelling companies (Australian Imperial Force Order
213, 3.8.1916). No's 4, 5, and 6 Aust. Tunnelling Companies
were despatched from Australia but were disbanded in August
1916 to reinforce the existing companies. The 'T' shaped
colour patch approved for the Corps, and later the individual
companies, was universally used in varying colours and designs
by tunnelling companies of most British Commonwealth forces
during this period. Note: AWM 25 Item No. 89/8 contains a
contemporary hand drawn sketch comprising a purple square with
a yellow diagonal strip superimposed. A note advises that this
patch was known to have been worn by an Australian mining unit
circa 1917, however no further information to confirm this
statement has been located at this point.
- 70. Australian
Electrical and Mechanical Mining and Boring Company, 1917 - 1919:
Auth. Australian Imperial Force Order 679,
29.5.1917. Formed in May 1916 from the headquarters of the Aust.
Mining Corps. This may be the unit referred to in the Note to No.
69.
- 71. 1st Aust. Tunnelling
Company, 1917 - 1919: Auth.
Australian Imperial Force Order 906, 12.10.1917.
- 72. 2nd Aust. Tunnelling
Company, 1917 - 1919: Auth.
Australian Imperial Force Order 906, 12.10.1917.
- 73. 3rd Aust. Tunnelling
Company, 1917 - 1919: Auth.
Australian Imperial Force Order 906, 12.10.1917.
- 74. 1st Anzac
Topographical Section, 1917 - 1918; and
- Australian Corps
Topographical Section, 1918 - 1919: Auth.
Australian Imperial Force Order 818, 17.8.1917.
- 75. No. 15 (Aust.) Light
Railway Operating Company, 1917 - 1918 : Auth.
Australian Imperial Force Order 644, 15.5.1917. Raised as No. 2
Section, Aust. Railway Troops, from members of the Victorian
Government Railways and was redesignated 1st Aust L.R.O. Coy on
5.3.1918.
- 76. No. 16 (Aust.) Light
Railway Operating Company, 1917 - 1918 :
Auth. Australian Imperial Force
Order 644, 15.5.1917. Raised as No.5 Section, Aust. Railway
Troops, from members of the Commonwealth Railways and was
redesignated 2nd Aust. L.R.O. Coy on 5.3.1918.
- 77. No. 17 (ANZAC) Light
Railway Operating Company, 1917 - 1918; and
- No. 17 (Aust.)
L.R.O. Coy, 1918 : Auth.
Australian Imperial Force Order 644, 15.5.1917. Formed from
the 1st ANZAC Light Railways in March 1917 and was
redesignated on 1. 1. 1918 (Australian Imperial Force Order
693, 12.6.1917, and Australian Imperial Force Order 1058,
8.1.1918). Became 3rd Aust. L.R.O. Coy on 5.3.1918.
- 78. No. 35 (Aust.) Broad
Gauge Railway Operating Company, 1917 - 1918 : Auth.
Australian Imperial Force Order 644, 15.5.1917. Raised as No. 4
Section, Aust. Railway Troops, from members of the Queensland,
South Australian, Tasmanian and NSW Government Railways and was
redesignated 4th Aust. B.G.R.O. Coy on 5.3.1918.
- 79. No. 59 (Aust.) Broad
Gauge Railway Operating Company, 1917 - 1918 : Auth.
Australian Imperial Force Order 644, 15.5.1917. Raised as No. 3
Section, Aust. Railway Troops, from members of the Western
Australian Government Railways, served briefly as 59th (Aust.)
Company, Railway Operating Division RE, and was redesignated 5th
Aust. B.G.R.O.
Coy on 5.3.1918.
- 80. No. 60 (Aust.) Broad
Gauge Railway Operating Company, 1917 - 1918 : Auth.
Australian Imperial Force Order 644, 15.5.1917. Raised as No. I
Section, Aust. Railway Troops, from members of the New South Wales
Government Railways, served briefly as 60th (Aust.)
Company, Railway Operating Division RE, and was redesignated 6th
Aust. B.G.R.O. Coy on 5.3.1918.
- Note: The five original Australian railway
operating companies were initially known as 'Sections',
re-designation to 'Company' occurring vide Australian Imperial
Force Order 684, 5.6.1917. In February 1918 the six companies
were placed under a Headquarters, Australian Railway
Companies, for administrative control and were again
redesignated by AIF Order 1141, 5.3.1918. The Corps historian
has stated that each company began wearing brass numerals in
the centre of its patch from this point, however Australian
Imperial Force Order 644 is clear in its intentions and
examples from the pre-March 1918 period do exist.
- 81. 1st Aust. Light
Railway Operating Company, 1918 - 1919:
- 82. 2nd Aust. Light
Railway Operating Company, 1918 - 1919
- 83. 3rd Aust. Light
Railway Operating Company, 1918; and
- 3rd Aust. Light
Railway (Forward) Company, 1918 - 1919:
- 84. 4th Aust. Broad
Gauge Railway Operating Company, 1918 - 1919:
- 85. 5th Aust. Broad
Gauge Railway Operating Company, 1918 - 1919:
- 86. 6th Aust. Broad
Gauge Railway Operating Company, 1918 - 1919:
- Note: Numerals for No's 71 to 73 were 1/2
inch high metal and No's 75 to 86 were of brass.
- 87. 1st Aust. Divisional
Signal Company, 1915 - 1919 Auth.
I Aust. Div. Order No. 562, 8.3.1915.
- 88. 2nd Aust. Divisional
Signal Company, 1915 - 1919 : Auth.
2 Aust. Div. Instruction, para. 2, 3.8.1915. Formed from No's 3
and 4 Sections, 2nd Signal Coy; No. 2 Section, 3rd Signal Coy; 4th
Signal Troop; and part of 1st Divisional Signal Coy.
- 89. 3rd Aust. Divisional
Signal Company, 1916 - 1919: Auth.
AEFO 231, 26.8.1916.
- 90. 4th Aust. Divisional
Signal Company, 1916 - 1919: Auth.
HQ Aust. and NZ Forces CM No. 17, 25.2.1916. Formed from the
former No.2 Section, 2nd Signal Company, and part of HQ and No. I
Section, 1st Divisional Signal Company.
- 91. 5th Aust. Divisional
Signal Company, 1916 - 1919: Auth.
HQ Aust. and NZ Forces CM No. 17, 25.2.1916. Formed from No. 3
Section, 3rd Signal Company, and part of HQ and No. I Section, 2nd
Divisional Signal Company.
- 92. 6th Aust. Divisional
Signal Company, 1917 : Auth. AAG
AIF Letter No. 15/42, 25.5.1917. Restricted to a nucleus of two
infantry brigade signal sections, not even rating a mention in the
Corps history.
|
 |
- 93. Australian Corps
Signal Company, 1918 - 1919 : Auth.
AEFO 1149, 12.3.1918. Raised on 22.2.1918 from the Corps Heavy
Artillery Signal Section, 1st and 2nd Aust. Airline Sections, and
Aust. Corps Wireless Section. It has not yet been possible to
confirm statements that prior to the issue of this patch, members
of some 1 ANZAC Corps signal units were wearing No. 68. It
replaced the existing 'K' Corps Signal Company, Royal Engineers,
on formation.
- HQ AIF Signal Section, 1919: No colour patch
was allotted to this unit, personnel continuing to wear the
patch of their previous unit. Australian Imperial Force Order
1636/1919 directed that NCOs and men on the establishment of
the unit would wear the regulation white and blue Signal
Service armlet.
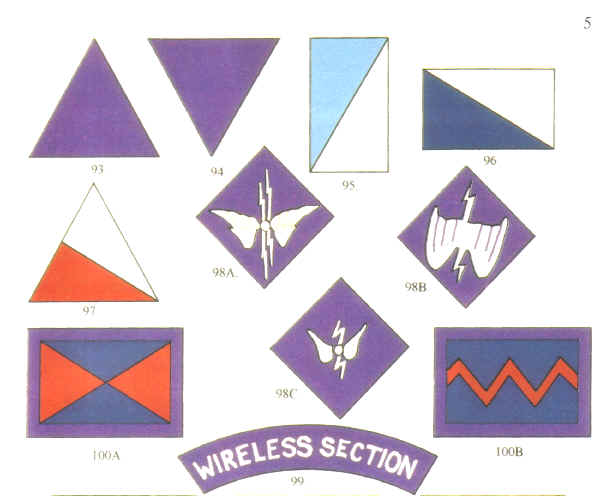
- 94 Australian Cavalry
Divisional Signal Squadron, 1917 - 1918 : Despite
an extensive search by the Australian War Memorial when the
existence of this patch first became known to them in 1939, they
were unable to locate an official authority. The unit was raised
in March 1917 for service in Mesopotamia with an Indian Army
cavalry division. It was disbanded in June 1918, with most of its
personnel transferring to the 1st Aust. Wireless Signal Squadron.
Former members of the unit contacted by the AWM in 1939 were
divided in their recollection of when tile patch was issued, one
stating that it was issued prior to embarkation in Australia in
May 1917, others that it was issued after arrival in Mesopotamia.
The unit colour patch was certainly portrayed on a Christmas card
issued to members of the Squadron in October 1917.
- 95. (a) 1st Signal
Squadron, A.E., 1916 - 1917, 1918 - 1919; and
- Australian and New
Zealand Mounted Division Signal Squadron, 1917 - 1918:
Auth. A & NZ Mtd Div, RO No. 1,
para. 4, 18.10.1916. Included the 1st, 2nd, and 3rd Signal
Troops, A.E.
- 95. (b) Australian
Pack Wireless Section, 1917 - 1918:
Formed in November 1917 for HQ Desert Mounted Column by
redesignation of 'C' Troop, Aust. and N.Z. Mounted Division
Signal Squadron. Absorbed into 2nd Signal Squadron, A.E., in
July 1918.
- 95. (c) 3rd Signal
Troop, A.E., 1917 - 1919: Originally
part of the 1st Signal Squadron, A.E., transferring to the
Imperial, later the Australian, Mounted Division Signal
Squadron, R.E., in February 1917, and to 2nd Signal Squadron,
A.E., in July 1918.
- 95. (d) 2nd Signal
Squadron, A.E., 1918 - 1919: Raised
in July 1918 for the Australian Mounted Division by absorbing
the Aust. Pack Wireless Section, No. 3 Aust. Airline Section,
and the AIF Cable Section, and included No's 3, 4, and 5
Signal Troops.
- 96. 4th Signal Troop,
A.E., 1917 - 1919: Auth.
Australian Imperial Force Order 795, 10.8.1917. Raised in February
1917 as part of the 4th Light Horse Brigade. At the time of
formation, its parent divisional signal squadron was a British
unit, hence the individual patch. A 4th Signal Troop had been
raised in March 1915 as part of the original 4th Light Horse
Brigade but was absorbed by the 2nd Divisional Signal Company in
August 1915.
- 97. 5th Signal Troop,
A.E., 1918 - 1919 : Auth.
Australian Imperial Force Order 1521, 21.1.1919. Raised in July
1918 as part of the 5th Light Horse Brigade. Possibly not issued
as the divisional signal squadron was by now wholly Australian
however examples do exist.
- 98A. 1st Australian
Wireless Signal Squadron, 1918 - 1919: Ref.
With Horse and Morse in Mesopotamia, 1927. The unit was raised in
January 1916 as the 1st Pack Wireless Signal Troop, forming 'C'
Troop, 1st Wireless Squadron R.E. in April 1916. The headquarters
and one troop of a wireless squadron were raised in Australia in
March 1916, and together with the Australian and New Zealand pack
wireless troops already serving in Mesopotamia became the 1st
(Australian and New Zealand) Wireless Signal Squadron on July 6th,
1916. The New Zealand troop was replaced by personnel of the
disbanded Aust. Cavalry Divisional Signal Squadron in June 1918
and the unit was redesignated on 23.7.1918. No authority for, or
date of introduction, can be located for this patch, although the
general design, in white worsted on khaki, had been in use as a
proficiency badge by members of the unit since formation. It is
noted in use at the time of the
squadron's last parades as a complete unit in February 1919, and
was still in use by 'D' Troop when they were demobilized in
December 1919. It was worn on the left hand side of the hat
puggaree, as well as on the jacket.
- 98B. 1st Aust. Wireless
Signal Squadron: Variation,
Military Heraldry Collection, AWM. The design is sewn to the
purple background in this example and it is possible that it is of
post-war manufacture.
- 98C. 1st Aust. Wireless
Signal Squadron: Hand
embroidered, a number of variations of this example existing in
private collections. Although probably locally manufactured in
India or Mesopotamia it is understood that these patches, together
with the associated wireless proficiency badges, were also made by
the troops' wives and girlfriends in Australia.
- 99. Australian Wireless
Sections, 1916 - 1918 : Auth.
Australian Imperial Force Order 412, 20.12.1916. 'The example held
in the Military Heraldry Collection, AWM, measures 4 and 7/8
inches long and 3/4 inch in width. Lettering is 3/8 inch high. In
July 1917 authority was given for 1st Anzac Corps Wireless Section
to be attached to 'K' Signal Company, while the wireless
sub-sections serving with the five divisions (A I, A2, B2, A3, and
A4 respectively) were absorbed by their respective divisional
signal companies. 1st Anzac Wireless Section was redesignated the
Aust. Wireless Section on 1.1.1918 and was absorbed by Aust. Corps
Signal Company in March 1918. It is believed that use of this
title probably ceased at this point.
- 100A. Signal
Sub-Sections, (Army) Brigades, A.F.A., 1917 - 1919 :
Auth. Australian Imperial Force Order 794, 10.8.1917.
- 100B. 36th Aust. Heavy
Artillery Brigade Signal Sub-Section, 1918 - 1919: Although
no authority has been located for this colour patch it is referred
to in correspondence between the Director of the AWM and Mr. P.H.
Wightman of the Official Historian's staff during the early
1920's, and appears as a sketch in AWM 25, item No. 89/8. Both
parties acknowledge its existence however the lack of an authority
precluded it from inclusion in the chart appearing in Volume III
of the Official War History.
|
|
The
material on this section of the site is drawn from "Distinguishing
Colour Patches of the Australian Military Forces 1915-1951" by
Keith Glyde. ISBN 0-6460-36640-8 |
|

