 |
|
|
|
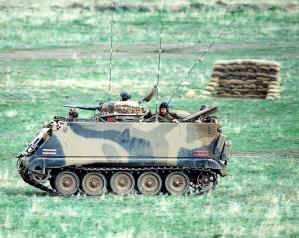
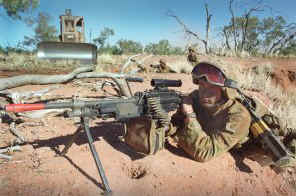
The 1st Brigade is the Australian Army's high readiness mechanised formation with excellent tactical mobility, a high level of endurance, hard hitting firepower and sophisticated communications. It is capable of conducting mechanised operations in mid-intensity conventional warfare and peace operations with UN and/or coalition forces. As an adaptable and versatile formation the Brigade is also capable of conducting peace operations concentrating on peacekeeping. The Bde maintains the ability to operate in complex political and military situations throughout a broad range of terrain and environments including urban and rural landscapes. 5th/7th Battalion, the Royal Australian RegimentThe 5th/7th Battalion, the Royal Australian Regiment (5/7RAR) was formed in 1973 by the amalgamation of the 5th and 7th Battalions which both served in South Vietnam. In 1975 the Battalion formed the main part of the Field Force Group Darwin during the clean up following Cyclone Tracy. In 1984 5/7RAR became a mechanised battalion and operates the M113 armoured personnel carrier. Its role is to seek out and close with the enemy by shock action firepower and manoeuvre, to kill or capture them, to seize and hold ground by day or night regardless of weather or terrain. The Battalion completed its move to Darwin in 1999.
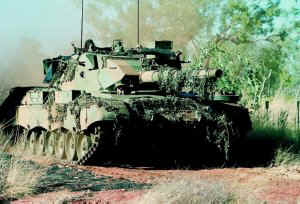
1st Armoured RegimentThe 1st Armoured Regiment was formed from the Australian Armoured Car Squadron, which served as part of the Commonwealth Occupation Force in Japan. In 1949 the unit occupied barracks at Puckapunyal. The 1st Armoured Regiment saw active service in Vietnam between 1968 and 1971 and moved to the NT in 1995. The role of the Regiment is, in co-ordination with other arms, to close with and destroy the enemy using fire, manoeuvre and shock action. The Leopard main battle tank is the unit’s principal weapon platform.
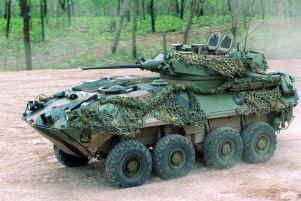
2nd Cavalry RegimentThe 2nd Cavalry Regiment was formed at Holsworthy in 1970 however its lineage dates back to the early light horse units. The Regiment’s role is to conduct reconnaissance operations, process information, and perform light offensive action. The unit consists of three reconnaissance squadrons equipped with the Australian Light Armoured Vehicle (ASLAV) capable of rapid movement over large distances and possessing an impressive cross-country capability. The main variant is the ASLAV-25 armed with a highly accurate 25mm chain gun mounted on a stabilised two-man Delco turret which can engage targets at long range by day or night.
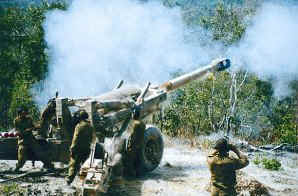
8th/12th Medium RegimentThe 8th/12th Medium was formed in 1973 from the 8th and 12th Medium Regiments. It consists of ‘A’ Field Battery, equipped with the 105mm L119 Hamel light gun and 103rd Medium Battery, equipped with the 155mm M198 howitzer and is based at Holsworthy. The Regiment’s role is to provide and co-ordinate joint offensive fire to the 1st Brigade and the 3RAR Parachute Battalion Group. ‘A’ Battery maintains the airborne commitment while 103rd Medium Battery provides fire support to the mechanised and armoured forces.
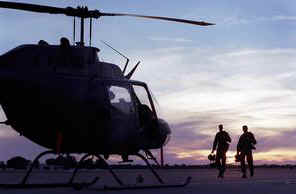
161st Reconnaissance SquadronThe 161st Reconnaissance Squadron was raised at RAAF Base Amberley in 1965 as 161st Independent Recce Flight and deployed with the first Australian combat troops to South Vietnam. Today the Squadron is based at RAAF Darwin operating as part of the 1st Aviation Regiment to provide reconnaissance support to the 1st Brigade. The Squadron is equipped with the Bell 206B Kiowa light observation helicopter which will be replaced early next century by an armed reconnaissance helicopter as part of the AIR 87 Project.
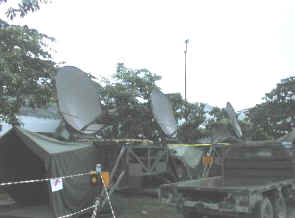
1st Command Support UnitThe 1st Command Support Unit (1CSU), formed in July 1997, provides the Brigade with the command and control functions to facilitate the conduct of offensive and defensive information operations. The unit comprises a communications and information systems (CIS) squadron, support squadron, intelligence squadron and a military police troop. 1CSU also provides the military information-processing centre for the Brigade headquarters.
1st Combat Engineer RegimentThe 1st Combat Engineer Regiment was raised at Holsworthy in 1993 from the amalgamation of HQ 1st Construction Regiment, 1st Field Squadron and 23rd Support Squadron. The unit’s lineage can be traced back to the 1st Field Company which took part in the initial assault at Gallipoli in 1915. 1st Field Squadron served in South Vietnam from 1965-1972. The role of the unit is to provide combat engineer support to the 1st Brigade. It utilises a variety of engineer equipment including assault bridging, earth-moving plant, mine laying and detection equipment and the M113 armoured personnel carrier.
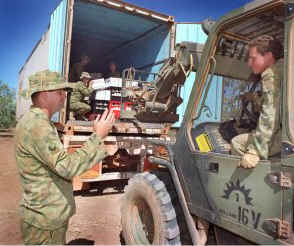
1st Combat Service Support BattalionThe 1st Combat Service Support Battalion was formed in 1997 and traces its lineage to First World War service corps units whose badge it bears today. The Battalion performs four major functions in order to provide logistic support to units of the 1st Brigade. They are: health, distribution, maintenance, and administration. The Battalion primarily operates heavy haulage equipment such as Mack trucks and tank transporters to support the Brigade’s operations across northern Australia. Five Australians have been awarded the Victoria Cross whilst serving with the 1st Brigade. They are:
Lance Corporal Leonard Maurice KeysorLeonard Keysor enlisted in the AIF on 18 August 1914 and was posted to 1st Battalion which was just forming at Randwick. Keysor embarked with his unit on 18 October, trained in the Middle East and participated in the Gallipoli landing on 25 April 1915; he was appointed Lance Corporal 20 June 1915. It was at Lone Pine that Lance Corporal Keysor won the first of seven Victoria Crosses awarded to Australians for that battle. The Lone Pine operation commenced just before sunset on 6 August 1915 and before darkness fell the 1st Brigade had established a line of defensive posts around Lone Pine. Just after dark the Turks moved in reinforcements and made the first of a series of bombing attacks that were to continue for three days. On 7 August Keysor was in a trench which was being heavily bombed by the enemy. At great risk to himself he picked up two live Turkish bombs and threw them back at the enemy. Although wounded, he kept throwing bombs. The next day, at the same place, he bombed the enemy out of a position which made his trench vulnerable. He was again wounded. Although he was marked for hospital he stayed in the trenches and threw bombs for another company which had lost its bomb throwers. Keysor kept throwing both Turkish bombs and crude Australian bombs, manufactured on the beach, for fifty hours before he allowed himself to be evacuated for treatment. Leonard Keysor died in London on 12 October 1951.
Private John HamiltonJohn Hamilton enlisted in the AIF on 15 September 1914. He joined the newly raised 3rd Battalion and embarked for Egypt with that unit on 18 October. He took part in the original landing on 25 April 1915 and a month later was evacuated with influenza, he returned to duty on 2 June. On 9 August the Turks launched a violent general attack along much of the front. The northern assault was directed at the junction between the 3rd and 4th Battalions. The Australians were forced back at Sasse’s Sap, but counter attacked and took, the position again. Later the enemy broke through the barricade and streamed up the Sap towards the Headquarters of the 3rd Battalion. The Adjutant ordered several men to fight off the Turks already in the trench and those still in open ground. Private Hamilton, under cover of a few sandbags, lay out in the open directing those still in the trenches where to throw their bombs while he continued sniping fire against the Turkish bomb throwers. His example had much to do with the enemy being driven off during this attack. John Patrick Hamilton died at Concord Repatriation Hospital on 27 February 1961.
Captain Alfred John ShoutAlfred John Shout enlisted in the AIF on 27 August 1914 and was appointed to the 1st Battalion as a second lieutenant and on 18 October embarked with his unit aboard A19 (SS Afric) for Egypt. Shout, promoted to lieutenant on 1 February 1915, distinguished himself both at the landing at Gallipoli on 25 April and during the next ten days. He was twice wounded in action, on 27 April and 11 May. For displaying conspicuous courage and ability in organizing and leading his men in the thick, bushy country under withering fire, exposing himself repeatedly to locate the enemy, and leading a bayonet charge on Turkish positions, he was awarded the Military Cross and mentioned in General Sir Ian Hamilton’s dispatches of 29 June. On 29 July he was promoted to Captain. On 6 August, at 5.40 pm, at the commencement of the battle of Lone Pine, Shout’s battalion attacked the Turkish trenches. The battalion had to beat off heavy counter-attacks the next day and was briefly withdrawn at 1130 am. By 3 pm the battalion was back in the line repelling fierce attacks. These were defeated and there was a brief respite until 4.30 am on the 8th. From then the unit fought continuously until 2 pm when it was relieved for a second time by the 7th Battalion. Early on the 9th the 1st Battalion re-entered Lone Pine. As a large portion of Sasse’s sap was found to be occupied by the enemy, Captains Shout and Sasse decided to clear it. They gathered together three men carrying sand-bags with which to construct barricades and then both officers charged down the trench, Shout bombing and Sasse shooting. They advanced in short ‘hops’, building a barricade at each stop. In the morning in one section of trench Shout killed eight enemy and routed the remainder. In the afternoon, gathering another party of eight and again accompanied by Sasse, he captured a further section of trench in similar fashion. They had just determined a suitable position for the final barricade when Shout lit three bombs for the final dash. The third bomb burst in his hand, blowing it completely away and shattering one side of his face and body. He was evacuated immediately but died of wounds aboard the hospital ship on 11 August. He was buried at sea.
Private Thomas James Bede KennyThomas Kenny enlisted in the AIF 23 August 1915 and embarked with the 13th reinforcements to the 2nd Battalion on 20 December. He joined the 2nd Battalion in Egypt on 27 February 1916. The 2nd Battalion went to France in March and Kenny fought in the battalion bombing platoon during the battle of Pozieres four months later. During March and April 1917 British and Australian forces captured ‘outpost villages’ defended by German forces withdrawing to the newly constructed Hindenburg Line. During the attack on the village of Hermies by the 2nd and 3rtd Battalions on 9 April, Kenny’s platoon came under heavy fire from a machine gun post, which caused severe casualties. Kenny under very heavy close-range fire, single-handedly rushed the enemy post and killed one man in front of the strong point. He then threw three bombs; the third knocked out the post. Private Kenny took the surviving occupants prisoner and a short while later the troops following found him in occupation. A line of posts was then established around the eastern side of the village by Kenny’s company and Hermies was completely sealed off. Private Kenny was immediately promoted to Lance Corporal and soon after was evacuated to Britain. He received his Victoria Cross from King George V at Buckingham Palace on 21 July 1917. Thomas Kenny died at Concord Repatriation Hospital 15 April 1953.
Corporal George Julian Howell"Snowy" Howell enlisted in the AIF on 3 June 1915 and was posted as a reinforcement to the 2nd Battalion which he joined in Gallipoli on the 1st November 1915. He went with the 1st to France and was wounded in July 1916 at the battle of Pozieres. On the 9th of April 1917 he was awarded the Military Medal for Courage and Devotion to duty while leading a rifle bombing section during the capture of the village of Demicourt. On the 3rd of May 1917 fourteen Divisions, including the Australian 2nd Division, attacked the Hindenburg Line. The only two units able to take and hold their objectives were the Canadians on the extreme right and the 6th Australian Brigade on the extreme left. During the next few days reinforcements were sent in to hold and extend the ground gained during the initial attack. The Germans launched a counter attack on the 6th May during which they used flame-throwers, this caused the 3rd Battalion to withdraw from its trenches. At 0600 hrs Corporal Howell notified his Battalion Headquarters that the unit to his right was withdrawing from its position. The 1st Battalion commander hurriedly organised a group to resist the enemy assault and this led to a fierce bombing fight. Howell, fearing that the enemy would outflank his battalion, climbed to the top of the parapet and bombed the enemy forcing them back along the trench. When his bombs ran out Howell continued to pursue the enemy with his bayonet, but as he was exposed to heavy bomb and rifle fire it was not long before he was seriously wounded. In the interval, the withdrawing battalions rallied and a party from the 1st reclaimed the ground lost in earlier fighting. Corporal Howell received both the Victoria Cross and Military Medal from King George V at Buckingham Palace on 21 July 1917. Corporal Howell died at the Perth Repatriation Hospital on 24 December 1964.
History of The 1st BrigadeThe 1st Brigade traces its origin to the formation of the First Australian Imperial Force (AIF) in 1914. It consisted of the NSW based 1st, 2nd, 3rd, and 4th Infantry Battalions. Troops from the 1st Brigade were among the first ashore at Gallipoli on the 25th of April 1915, and deployed to the Western Front following the withdrawal from Anzac Cove. In the years 1916 to 1918, the brigade fought in France and Belgium, and was involved in such famous battles as, Hazebrouck, Passchendaele, Bullecourt, Ypres, Pozieres, and the Hindenburg Line. Five Victoria Crosses were awarded to members of 1st Brigade during the First World War. The Brigade was disbanded with the remainder of the AIF, in 1919, and re-raised as part of the Citizens Militia Forces in March 1921. It initially consisted of the 13th, 32nd, 35th and 41st Infantry Battalions. The brigade was assigned to training and defensive duties in south eastern Australia. It continued in this role throughout the Second World War. The history of the 1st Brigade as part of the permanent military forces
commenced in 1948 when the 34th Infantry Brigade group, part of the
British Commonwealth occupation forces in Japan, The period 1950 to 1964 saw extensive Australian Military involvement
in South East Asia. The years 1972 - 1981 saw the formation re-named 1st Task Force, (1TF)
with units located In 1992, the 2nd Cavalry Regiment became the first brigade unit to relocate to Darwin, in the Northern Territory as part of the APIN (Army Presence in the North) project. 1st Armoured Regiment completed its move from Puckapunyal to Robertson Barracks in 1996 followed by the remaining units in successive years. By mid-2000 the Brigade will be relocated as a complete formation in the NT. |